Learn how to lay out a vegetable garden for your space and the plants you want to grow—from super-fresh lettuce to juicy tomatoes. In this article (with companion video), we discuss the benefits different styles of garden beds. We’ll also demonstrate how to position your vegetables for a better harvest.
Site Selection
Before we get started, let’s consider the location of your garden.
- Where do you get the most sun? Ideally, choose the sunniest part of the garden for your beds, away from frost pockets. Most vegetables need 6 to 8 hours of direct sun a day! Note that the south, east, and west sides of your home will get more sun than the north.
- How far away is the water? Make sure you have easy access to a hose or water source!
- Is there a spot near the house? The ideal garden is one ou can see outside your door or window so it’s easy to water and keep an eye on!
- Is there a nice clearing? If you have too many shrubs or trees nearby, they may compete with your garden for nutrients and moisture as well as sunlight.
- How large do you want your garden? It’s better to start small! If you’re new to vegetable gardening, a 10’ x 10’ garden (100 square feet) is a great place to start.
Which plants do you want to grow?
- For a beginner, perhaps pick 3 to 5 plants that you would like to grow, and buy 3 to 5 plants of each one. See the most popular vegetables, herbs, and fruit here.
- Here’s a good article and list of vegetables for the beginner gardener.
- If you’re growing annual plants (most vegetable seeds need to be planted each year), then look at dedicated vegetable beds.
- For the perennials (such as asparagus, rhubarb, strawberries), you may want to dedicate a separate space.
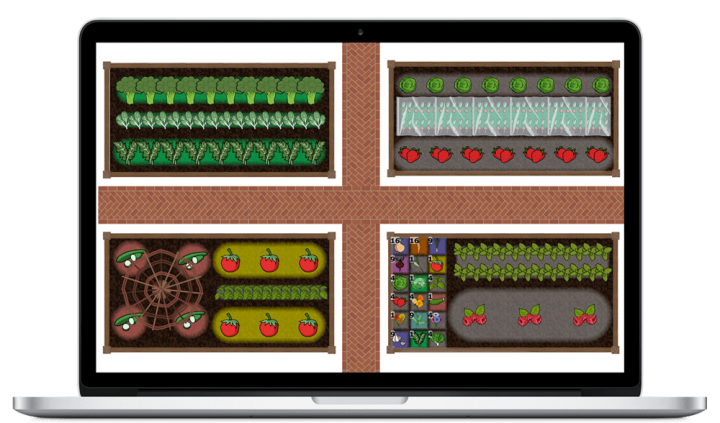
- If you have our Garden Planner, we make it easy to plan where to grow your fruits and vegetables. Select a crop from the plant selection bar and add it to your plan. Use the corner handles to extend the row or expand it out into a block, and the Garden Planner will automatically calculate how many plants can be grown in that space.

Plan Dedicated Vegetable Beds
Growing in dedicated beds reduces soil compaction, helps to simplify crop rotation, and makes weeding and protecting your crops a snap. A simple bed system in your garden will make it easy to plan, tend and harvest your crops.
You can lay out your beds on paper, but today, we much prefer to lay them out on the computer with the Almanac Garden Planner. It automatically calculates how much space each plant requires, your frost dates, your planting dates, and so much more.
- Beds can be laid out at soil level or raised, and should be no more than 3 to 4 feet wide to make it easy to reach into the center without stepping on the soil.
- The length of your beds should take into account how far you are willing to walk to get around to the other side.
- A narrow bed also enables you to grow plants in blocks rather than rows, which helps suppress weeds and maximizes the number of plants you can grow in that space.
- Make each bed the same size to make it simple to move crops, row covers, and cloches from bed to bed as required.
(Note: On the Garden Planner, mark out your beds with the rectangle tool. Switch your tool to Garden Objects to select a particular style of raised bed.)
Design Your Paths
- Make access paths between beds at least 2 feet wide to enable easy access for weeding and harvesting.
- Paths can be made of grass if they can be easily mown.
- Alternatively, lay cardboard and cover it with a mulch of wood chips, or pour a loose material such as gravel over weed-suppressing fabric.
- For a more permanent path surface, consider using brick or pavers.
If you’re using our Garden Planner, there are a number of path types to add to your plan. Irregular shapes can be created by selecting a texture from the Palette, then adding solid shapes.
Positioning Vegetables in Beds
1. Tender Plants
Grow tender plants such as tomatoes and peppers in the warmest, sunniest parts of the plot, so add these to your plan these first.
2. Sprawling Plants
Next, consider plants such as squash that need a lot of space. Add these near the edges of beds so they don’t smother neighboring plants.
3. Climbing Crops
Tall-growing climbers such as peas and pole beans should be located where they won’t shade lower-growing vegetables.
You may want to take advantage of potential shade to grow cool-season crops like lettuce and spinach, especially in hot climates.
4. Quick-Access Crops
Plants that are regularly harvested and which don’t need to be included in crop rotation, such as herbs and salad leaves, should be positioned in beds nearest to the kitchen.
5. Pollination and Companion Planting
Consider pollination requirements. Corn, for example, is best grown in blocks rather than rows, as they are wind pollinated.
Include pollinator plants and plenty of flowers such as calendula to attract beneficial insects to your garden and help improve pollination of fruit or pod-bearing crops!
6. Thirsty Plants
Thirsty plants such as salad leaves are likely to need regular watering. Cluster these plants together in a damper part of the garden or where irrigation can easily be supplied.
Finally, if this isn’t your first garden, think about where you planted your veggies last year, then be sure to rotate them to different beds for the coming season to help prevent diseases and avoid plant-hungry pests that overwinter in the soil. Our Garden Planner actually has a crop rotation feature and even warns you when you need to rotate!

Try Out the Almanac Garden Planner for Free
All the best with your garden plan!
As a courtesy, the online Almanac Garden Planner is free for 7 days. This is plenty of time to play around on your computer and try it out. There are absolutely no strings attached. We are most interested in encouraging folks to try growing a garden of goodness!
Not only does the Garden Planner help you lay out a garden, but we also provide you with a customized planting calendar so you know when to plant what. Plus, we provide lots of gardening videos and techniques to help you out!
Try out the Garden Planner on your computer (for free).


