
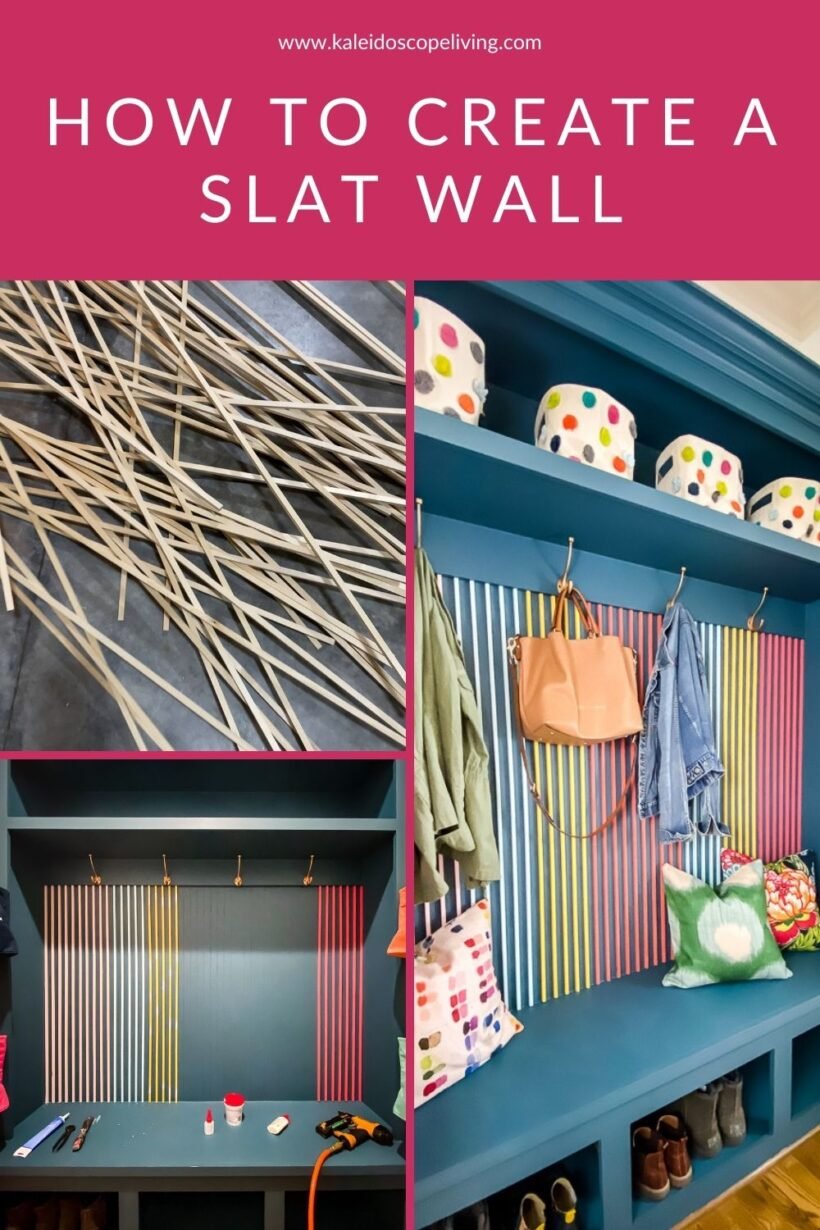


Add interest to any area of your home with this DIY wood slat wall treatment! Read on for the full materials list and tutorial.

If you follow me over on Instagram, you may have already seen our colorful mudroom makeover and wood slat wall projects unfold. But so many of you loved it, I wanted to be sure to create a tutorial for you! This project was really easy and affordable. Best of all, it makes a HUGE impact in a small space.
I really wanted to update the look of our mudroom after recently finishing our laundry room. The spaces are right beside each other and it felt weird to have a colorful and beautiful laundry room right next to a lifeless mudroom. You can see how the two rooms relate to each other in the photos at the end of this post.
Thank you to DAP Products for sponsoring this post. As always, all opinions are 100% my own. This post contains some affiliate links for your convenience. Click here to read my full disclosure policy.
How to Install Square Wood Dowels on a Wall
You can see a good overview of this project in the video below. There is also a written tutorial below the video for your convenience 🙂
Steps:
1) Start by cutting all of your wood dowels to length. I set up a simple jig once I determined the correct length so that I could cut 4 at a time without measuring each time. It moved pretty quickly. Use sandpaper to clean up and rough edges caused by your cuts.

2) Paint 3 sides of each wood dowel in whatever colors you like. I used Bee, Swimming, Oleander and Quite Coral by Sherwin-Williams as well as Coral Crush in this brand to paint the wood dowels. (If you are curious, I used this paint in Seaside to paint the entire mudroom built-in).


3) Once the paint has dried, run a small bead of DAP Weldwood Original Wood Glue on the unpainted side of each dowel. Then attach it to your wall by placing a finishing nail at the top, middle and bottom. If your wood isn’t perfectly straight, you may need a few additional nails to hold it in a perfectly straight position. Because I was placing my dowels over beadboard, I used the beads in the wood to dictate my spacing. If you are installing this treatment on a flat wall, decide on your placement and use a piece of scrap wood cut to the size of your desired spacing to ensure even spacing.


4) Repeat until you are finished! Then use DAP Fast N’ Final Lightweight Spackling to fill any nail holes. It’s my favorite spackling to use because it dries quickly and it allows you to patch and prime all in one step. You can read some of my spackling tips in this post. Allow to dry then sand and touch-up paint as needed.


That’s it! So easy and just look at what a huge impact it makes in a space! Take a look at the before and after.


I hope your creativity juices are flowing and you are thinking of a way to incorporate a wood slat wall in your own home. I love that you can totally change the colors and even the spacing to create an entirely different look!
Mudroom Source List
If you are looking for any of the sources for the items you see in our mudroom, just click on any of the images below for full product details.


