
It’s almost time for us to transform Attley’s brown, beige and boring bathroom into a colorful and fun space! As we did with Avery’s bathroom, we will be working with all of the existing materials to make this a very affordable makeover!
Hey friends! If you’ve been following along with my projects lately, you know I just recently gave Avery’s bathroom a huge but budget-friendly makeover. Well, soon I’ll be turning our attention to Attley’s bathroom. It’s almost identical to Avery’s old bathroom. In other words, it’s every shade of brown and beige you can imagine. Not at all Attley’s style (she loves COLOR just like her mama).
If you missed the post where I talked about our plans for Avery’s bathroom makeover, let me briefly talk you through why we decided against completely demolishing our girls’ bathrooms and starting from scratch. Here’s the thing… There’s absolutely nothing wrong with the bathrooms. There are no leaks. There are no cracked tiles. The bathtubs, sinks and vanities are all in great shape. The bathrooms are outdated, but that’s literally the only thing “wrong” with them.
So in the end, I just couldn’t wrap my head around ripping everything out and starting from scratch. It felt wasteful from a material standpoint AND from a budget standpoint. Especially for our girls’ bathrooms. It just doesn’t make sense to spend thousands of dollars on kids’ bathrooms that have perfectly good layouts and are completely undamaged and functional.
This is what Attley’s bathroom currently looks like.
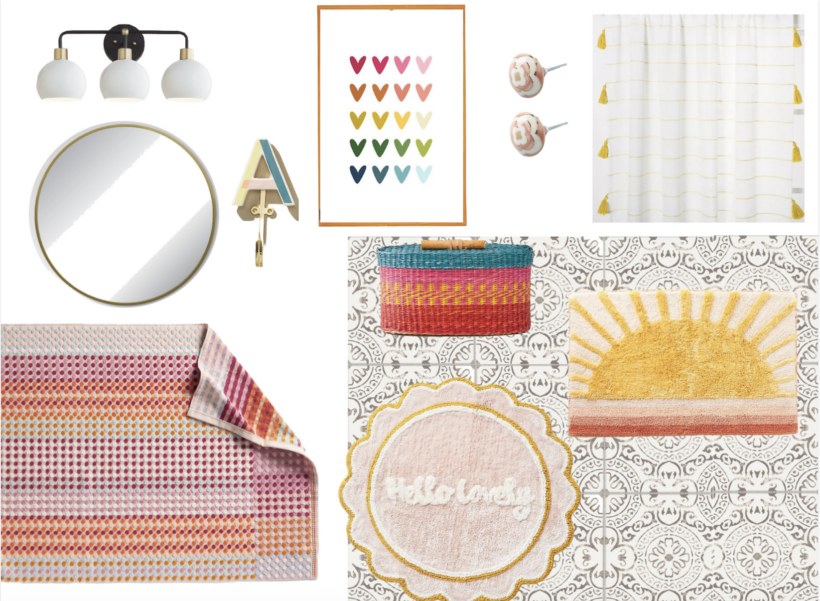
To make Attley’s bathroom look completely different and fit her color-loving style, I got creative. Just like with Avery’s bathroom, I won’t be changing the tile, vanity or any of the tile. Let’s take a look at the design plan, and then I’ll explain exactly what’s happening in her bathroom.
The Design Plan
The Logistics
If you are wondering how in the world I’m going to pull off a dramatic makeover with all that brown tile and outdated vanity still in place, let me explain.
I’ll be covering the floor tiles with these GORGEOUS tile stickers (you may remember that we used tile stickers in our laundry room several months back and also used them in Avery’s bathroom). Unfortunately, tile stickers can’t be used in a shower. I COULD paint them using this method, but I really don’t want to because it’s time-consuming and gives of INTENSE fumes. But, I did recently read about a different, easier and less stinky method of painting shower tiles and I might try it in Attley’s bathroom. To be determined.
Instead, I’m going to hang these 9-foot curtains on each side of the shower and this 9-foot shower curtain (yes, you can get them that long) in the middle so that we really don’t see the tile unless we are in the shower. Even if I wind up painting her shower tiles, I really love the look of floor-to-ceiling curtains.
As for the vanity, I’ll be painting the cabinet base using this method AND I’ll be painting the granite countertop using this method. I’ll also be replacing the hardware. After all that is done, you won’t recognize it.
The other changes will be easy! I am going to start by painting the brown walls white (that alone will be a welcome change). And I’ll be changing out the mirror, light fixture and sink faucet which will go a long way in updating the space.
And I’ll be adding artwork and accessories that reflect Attley’s love of every color in the rainbow! It will finally feel like a seamless transition from her colorful bedroom into her bathroom. Right now it feels disjointed at best, lol.
So that’s the plan! I’m hoping it will be a pretty quick makeover, but you never know. Be sure to follow along on Instagram since I’ll be sharing every step of the makeover in my stories!
Click on any image below for full product details.
I created this design the same way I create all of my other designs. I pulled out my Designer in a Binder® and moved through it step-by-step (if you are a Designer in a Binder® customer and are curious, the bathmat was the “crucial element” for Avery’s bathroom–it made all the other decisions so easy)!
Designer in a Binder® is the simple system I have used for years and years to design spaces in my own home. A couple of years ago, I finally put it all down on paper so that others can use it as well! In it I walk you through all the important stuff like choosing items that are the correct scale, space planning, mixing patterns, choosing colors and more! I give easy-to-understand guidance on all of this in Designer in a Binder®! You can order your binder now. We have over 9,000 happy customers so far! Click HERE to learn more.


