
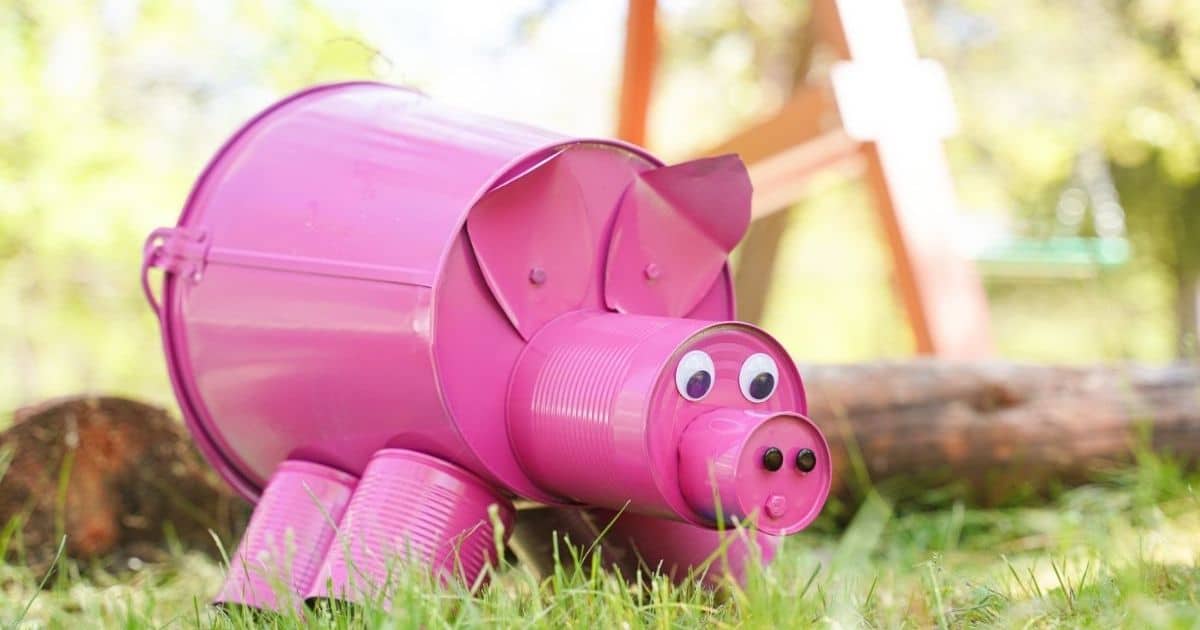


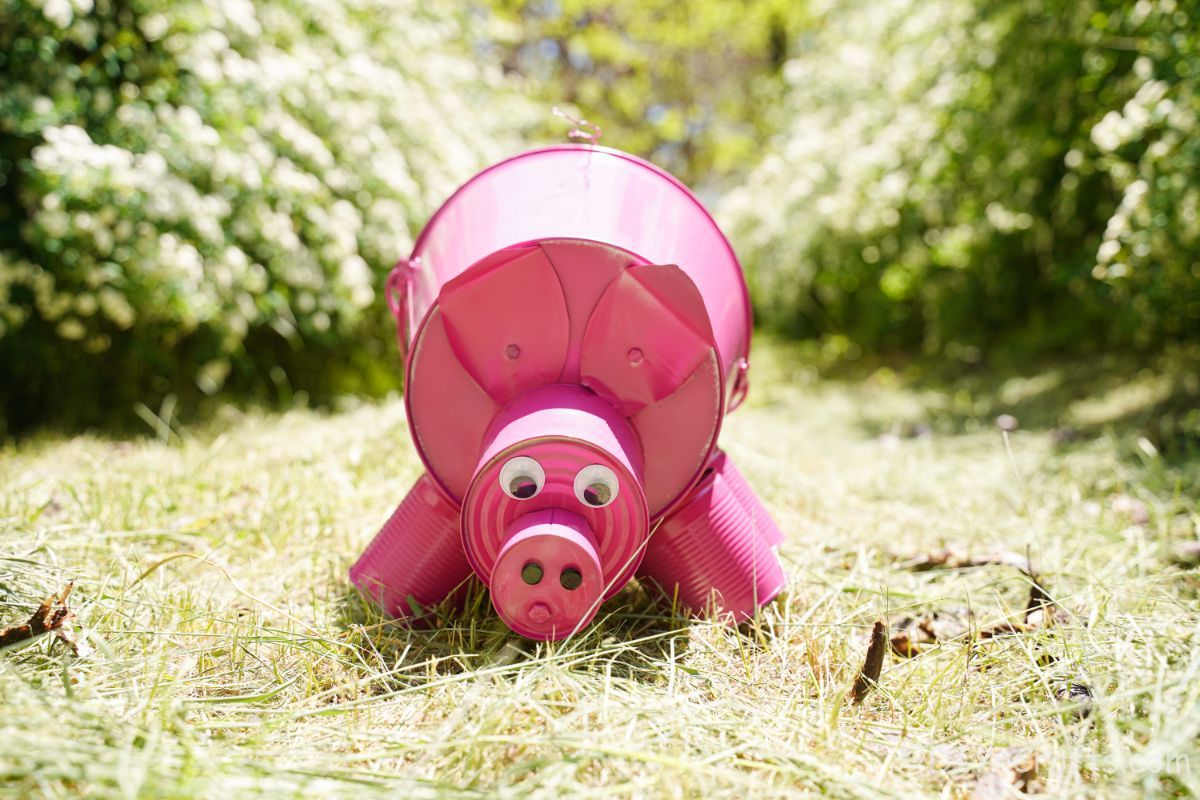
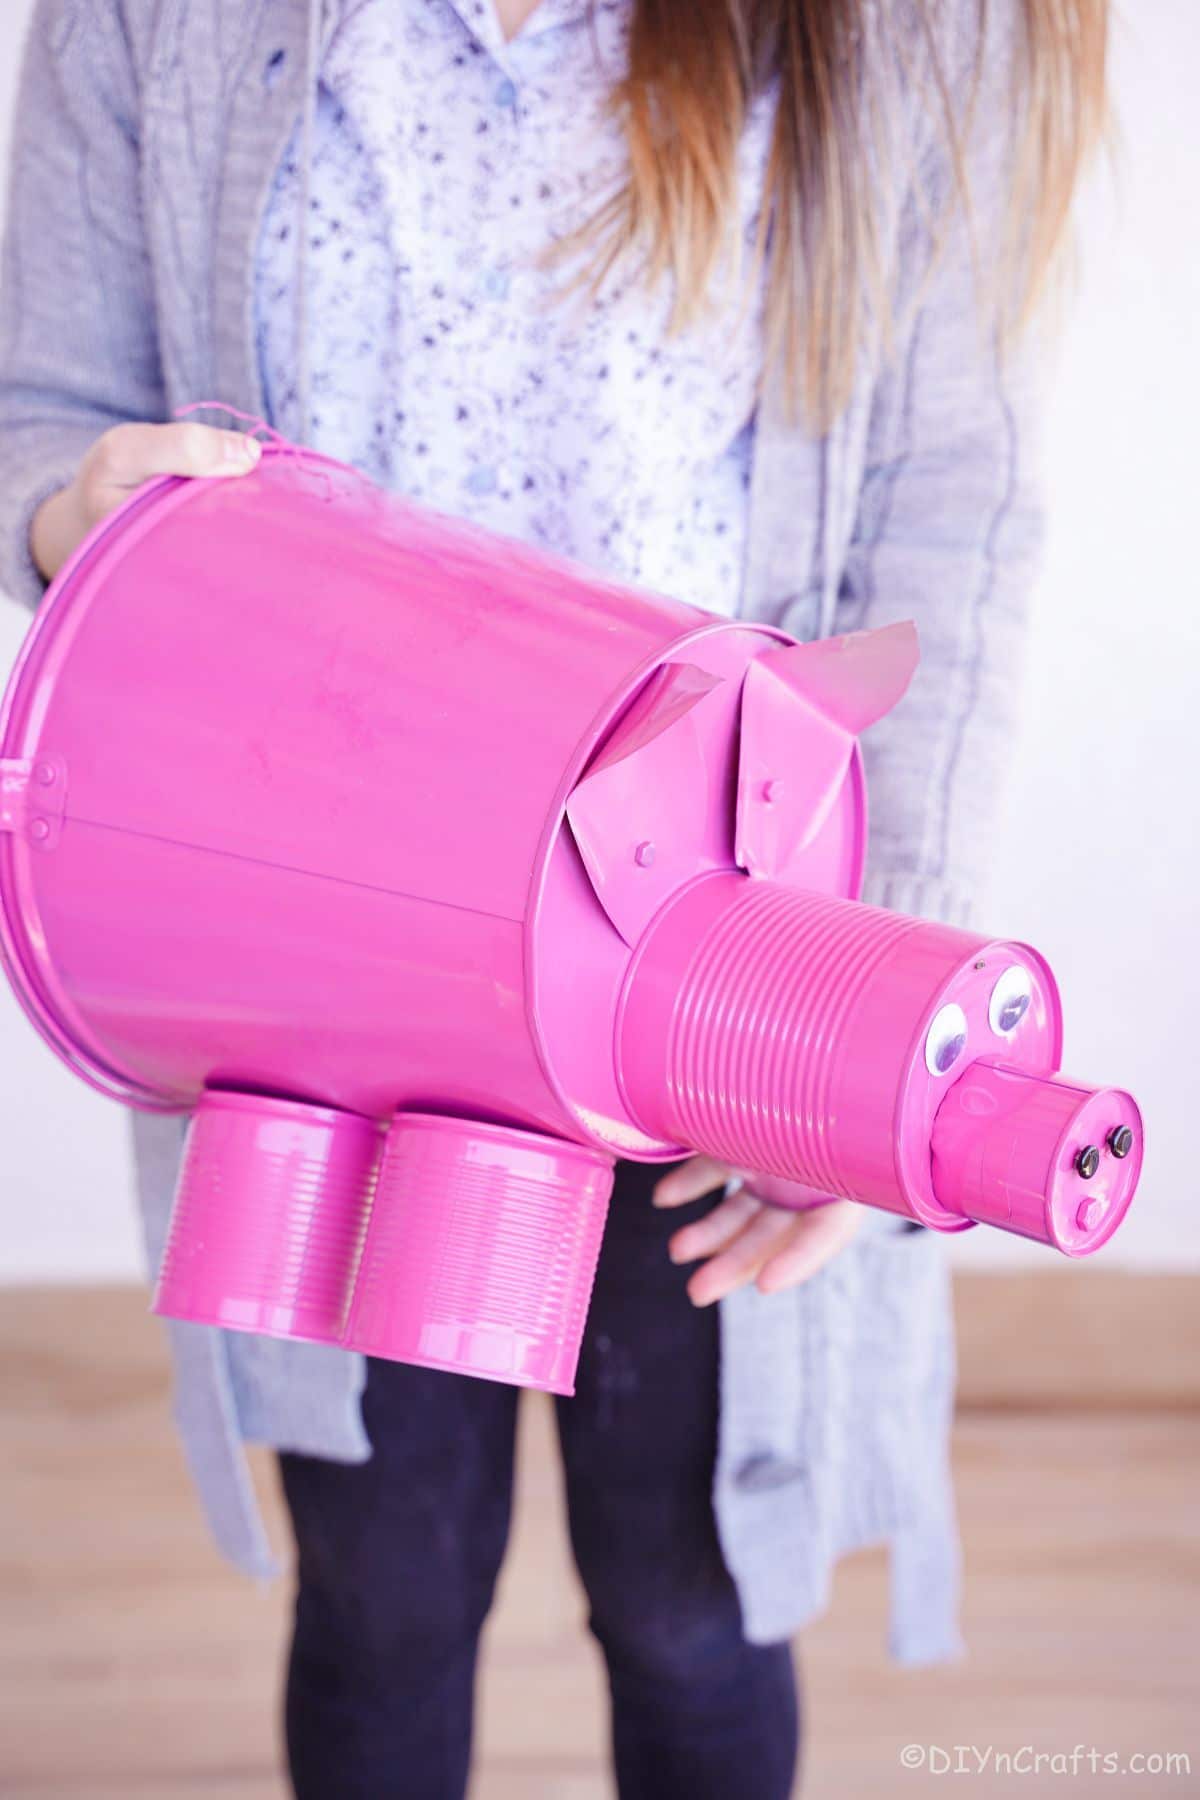
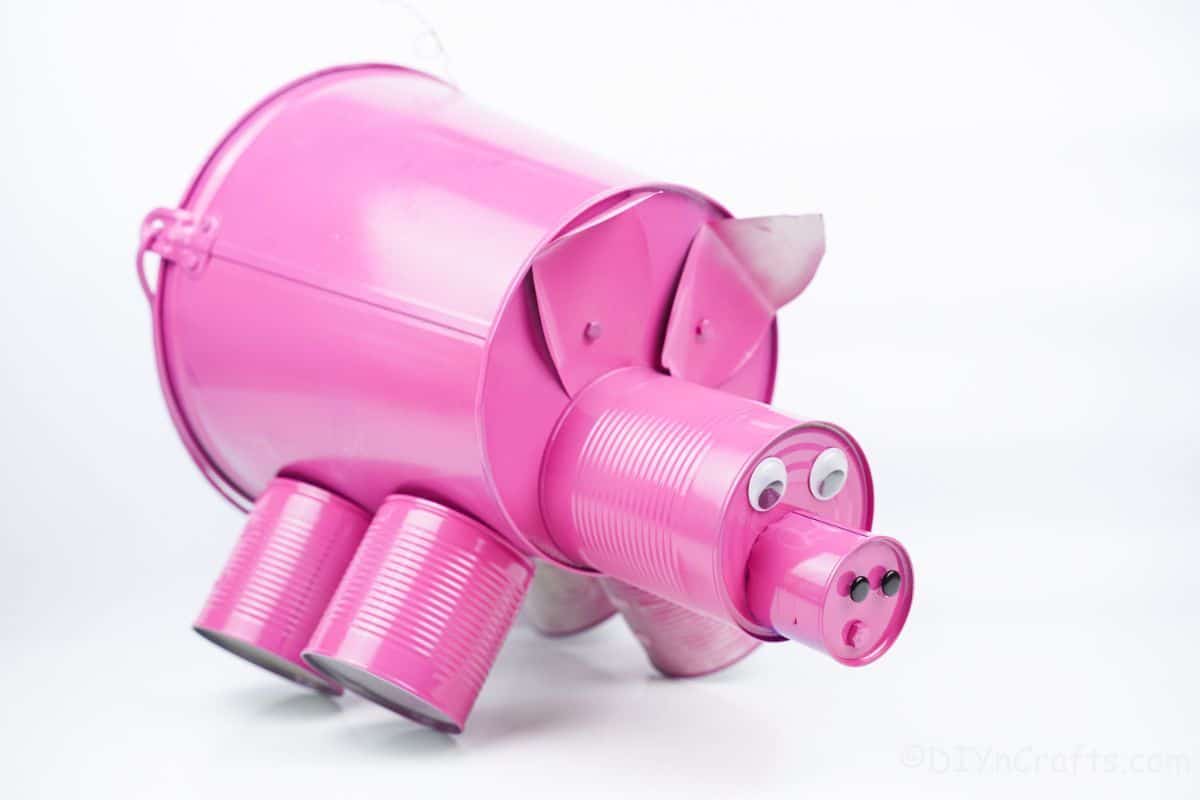
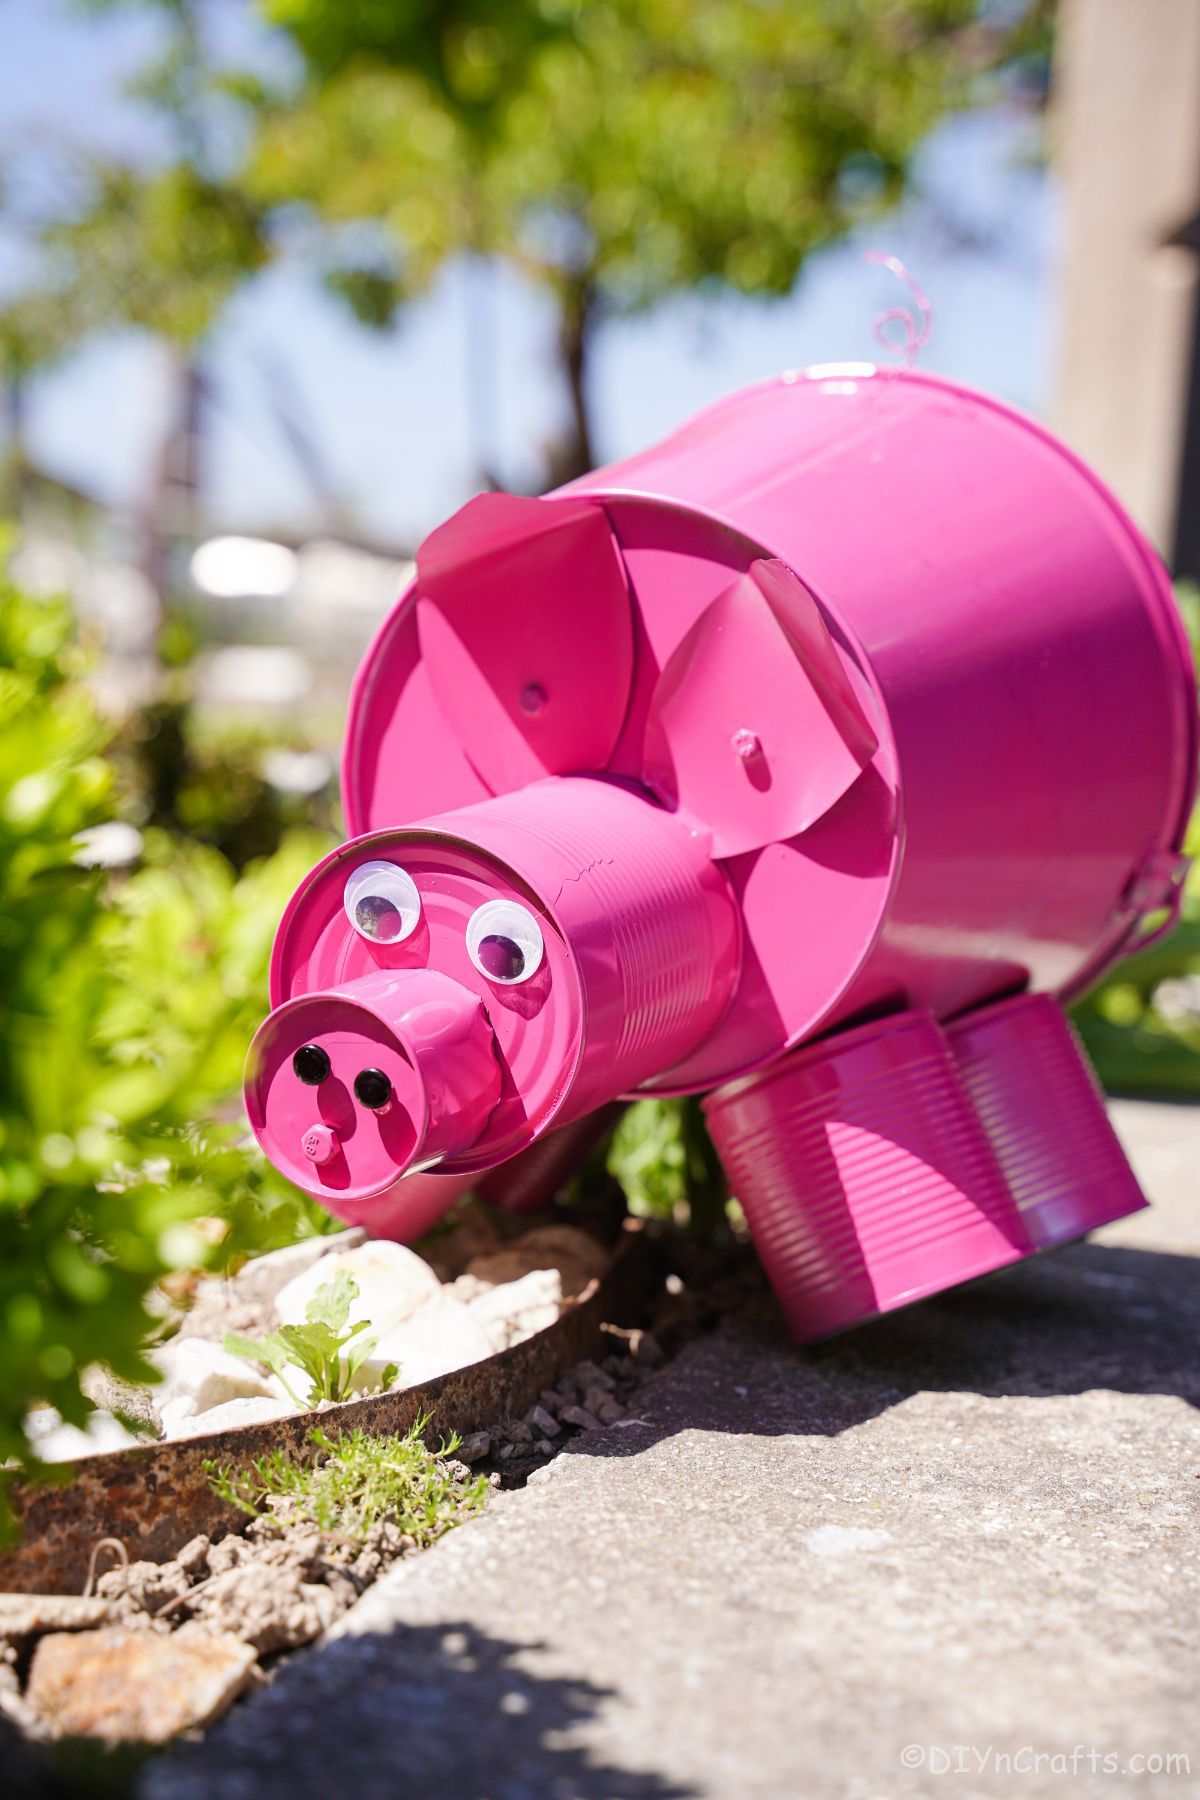
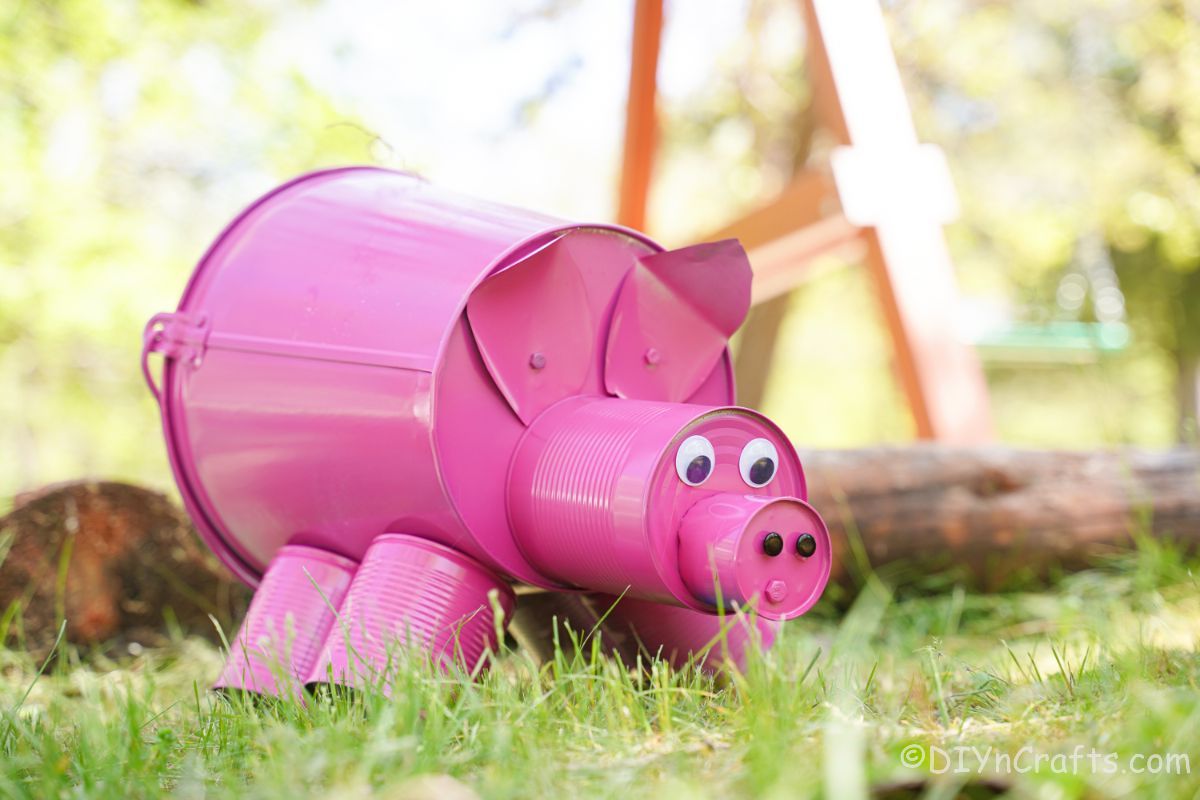
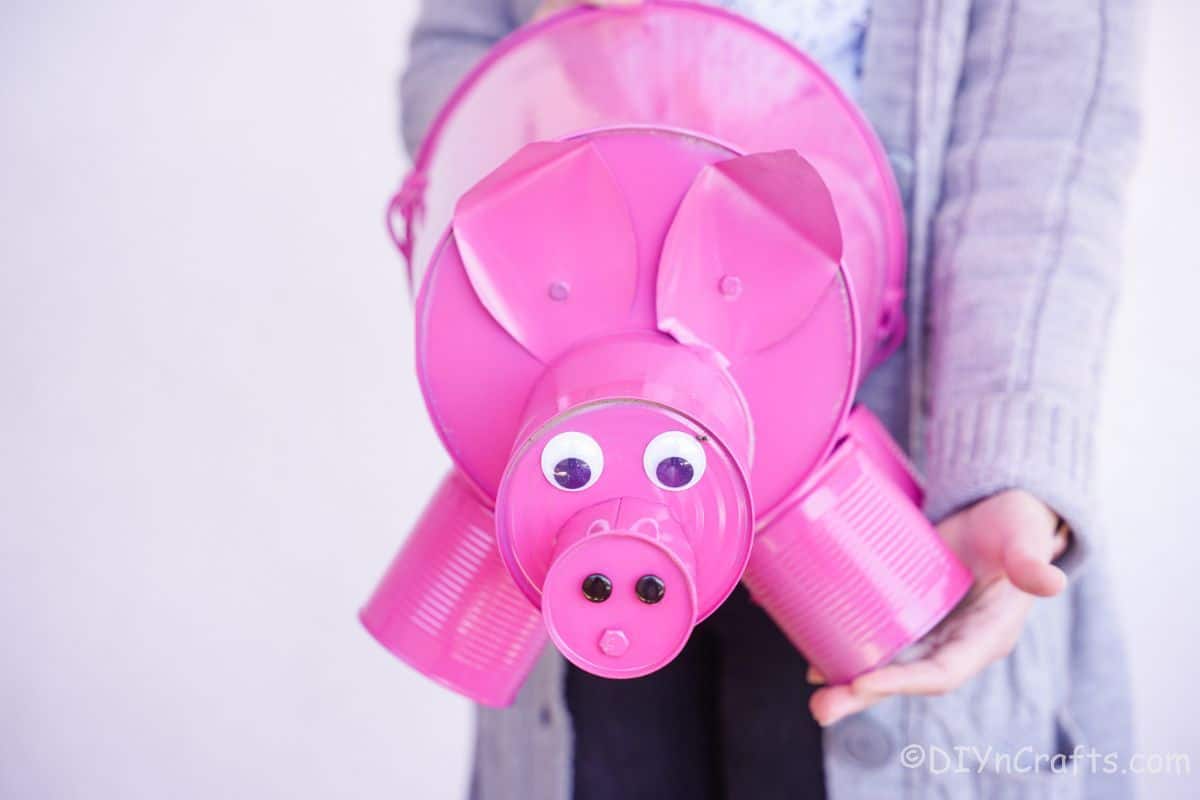
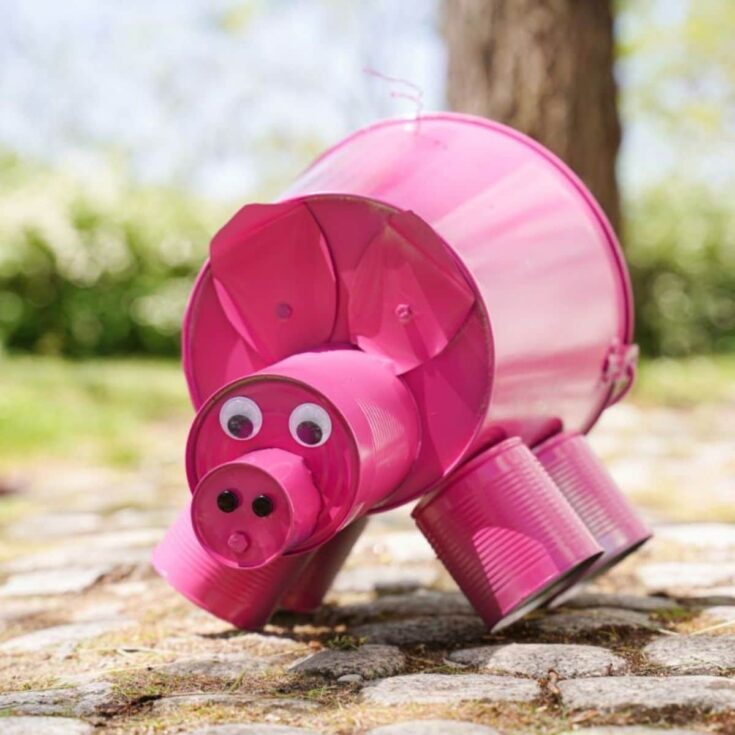
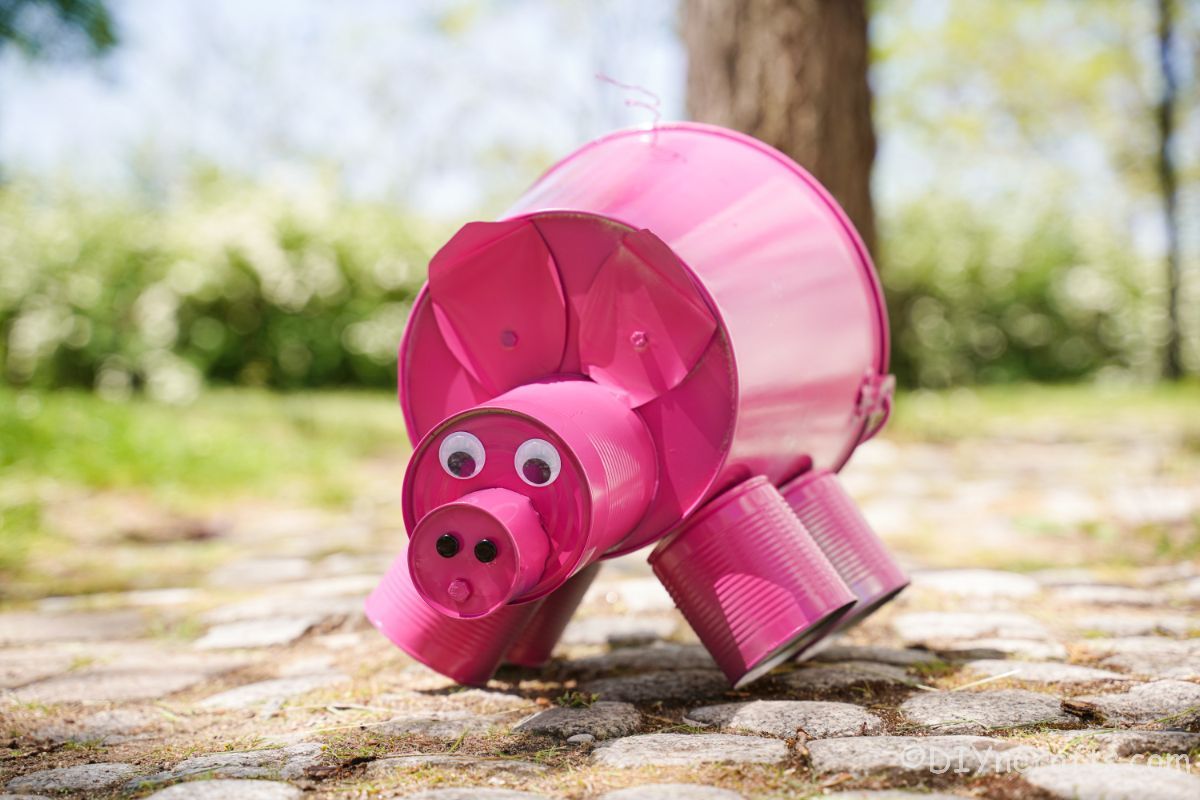
How adorable is this cute little tin can pig? A perfect addition to your garden, front porch, or even home decor, this only needs a handful of supplies, most of which you already have on hand. This is sure to bring a smile to your face every time you see it. Not only is it super cute, but it’s also good for the environment.

Tin Can Pig Garden Decor
Pigs are so cute and silly! I often see them in relation to farmhouse decor, but they can also be a great addition to any home, garden, or porch. This is made using upcycled tin cans and a few bolts along with some spray paint. It is really simple to make, and other than letting the paint dry can be done in just a few minutes’ time.
You will love how this owl decoration brightens up your garden. It’s the perfect way to add some personality and whimsy to your outdoor space. We love using things like cans and buckets for decor. While this is a bit different, you can also use five-gallon buckets for DIY projects. That list has tons of ideas to check out!
What Sized Cans Do I Need?
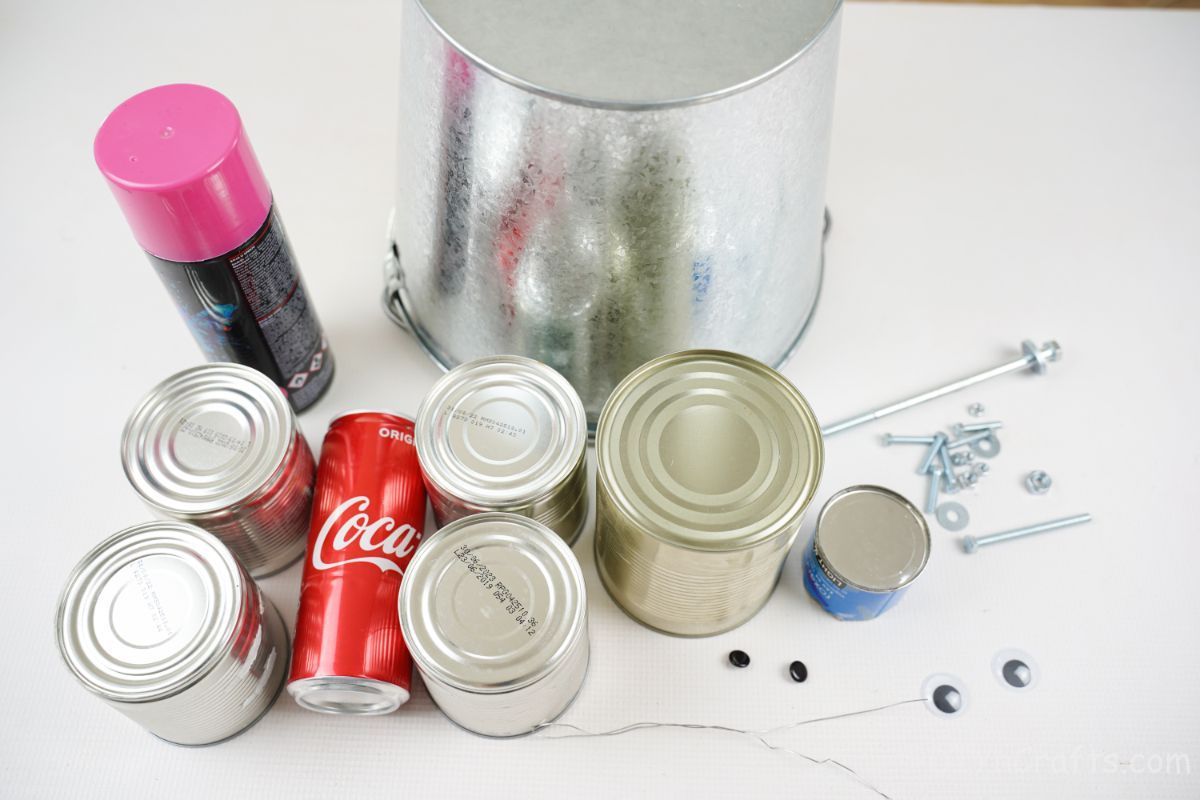
For this project, you will need 4 types of cans. A large bucket or can, a few medium typical tin cans from things like vegetables or similar, a smaller can from something like tuna, and an empty soft drink or beer can.
You can make this in different sizes, of course, so you want to focus on making the body of the pig extra-large compared to the other pieces. The legs of the pig will be the average-sized cans and the snout the smaller cans.
A galvanized bucket was the base of this for ours, but you can use the very large size 10 cans that you find in the bulk area of the grocery store. Another option is to use an old gallon paint can. This can also be made with plastic containers if you prefer.
What Can I Use to Make the Pig Face?
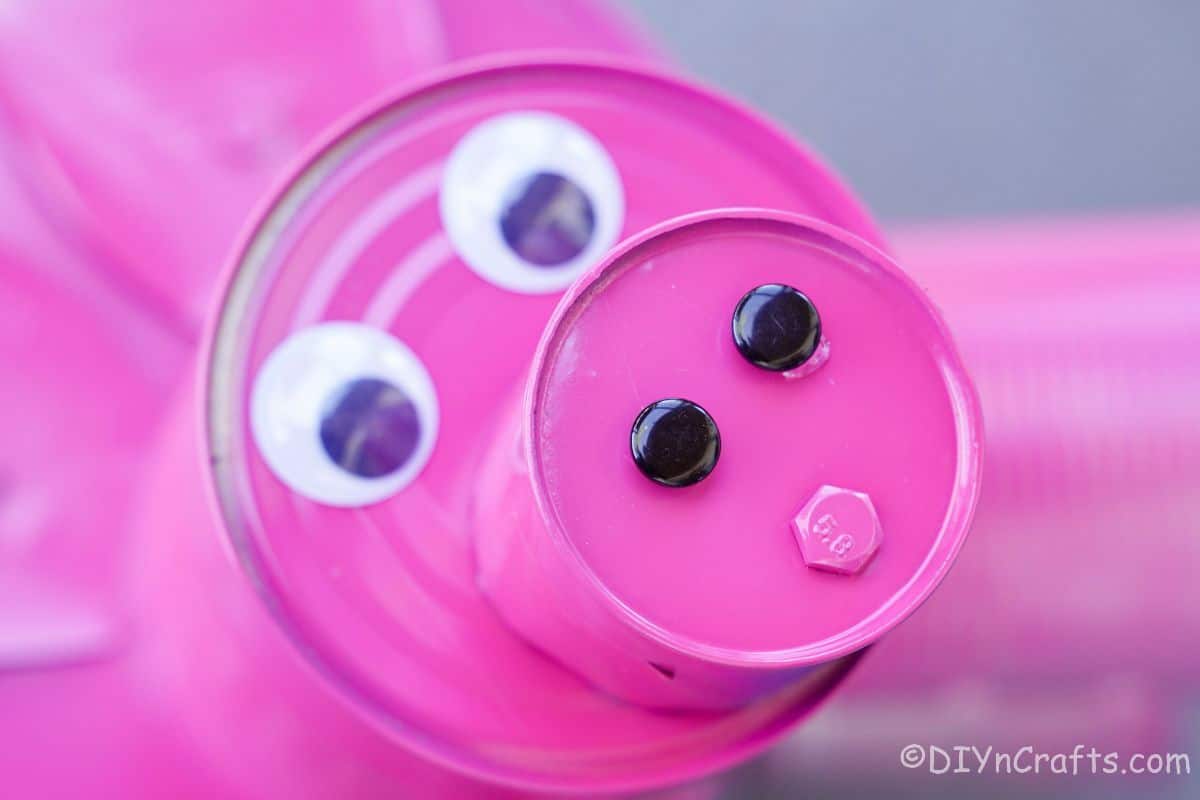
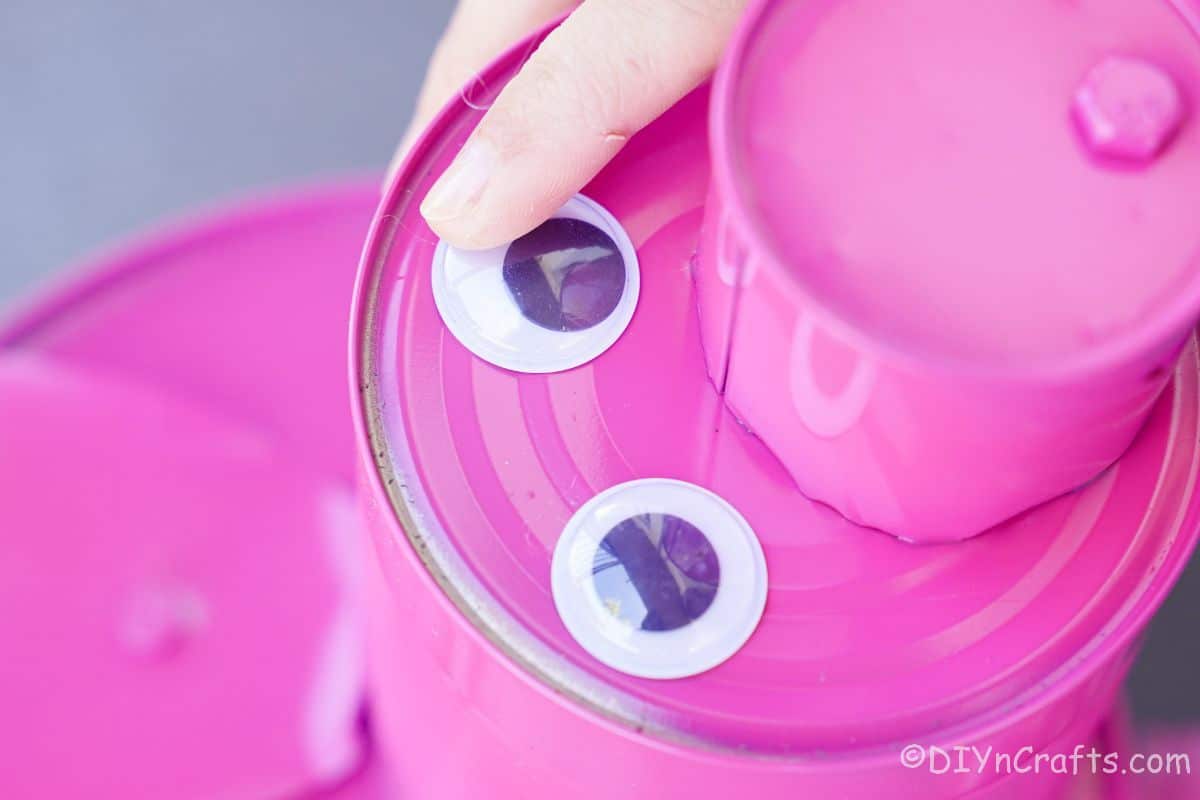
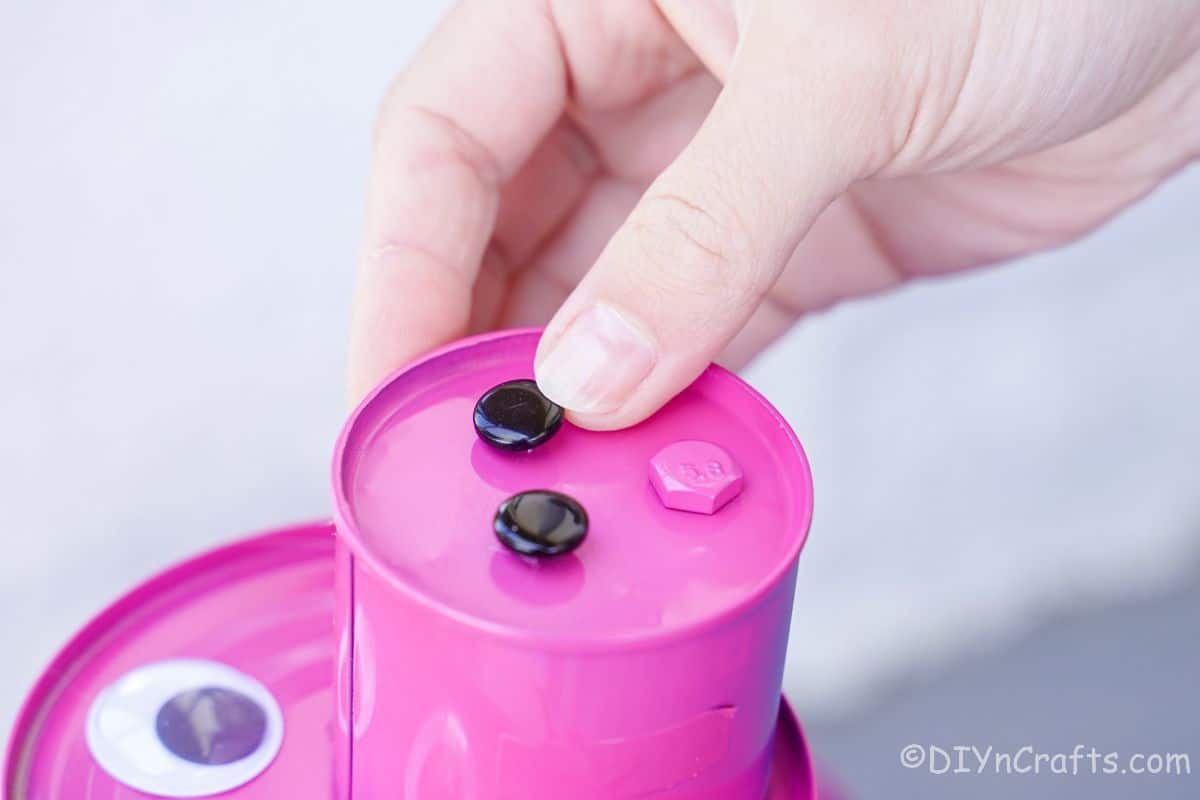
I am using a smaller can to make the snout of my pig. Then I add googly eyes to make it look extra cute. You want to use beads or buttons on the snout the make the nose of the pig.
You can also use paint, stickers, or even other bits of craft supplies shaped into the style needed for making the pig’s face. Additionally, a small bit of plastic, yarn, or paint can be added to create a smile if you wish.
Is This Safe to Display Outdoors?
The tin can pig can be used outside, in your garden, or as a yard decoration. Since you are painting it, you will want to seal it with a weather sealant so that the paint does not come off and this will help prevent the tin cans from rusting. The only other consideration that should be made is that the eyes and nose should be weatherproof.
How Can I Customize My Pig Garden Decor?
I love when it is easy to customize a craft. That way you can really make it your own. Plus, no one wants to see the same craft over and over again.
To start, this pig can easily be customized by changing the paint color. While pigs are typically thought of as pink, they are actually many colors. If you want a more natural look, brown, black, tan, or white can also be used.
Changing the face or adding something unique to the tail or ears can also make your pig a bit more unique. Another super easy addition is to add a bow or even bow-tie to give your pig a gender.
I love the idea of also adding a sign to the side or around the “neck” of the pig that says “oink”. You could even add a welcome sign and use this beside your front door!
Supplies Needed
How to Make a Tin Can Pig Garden Decoration
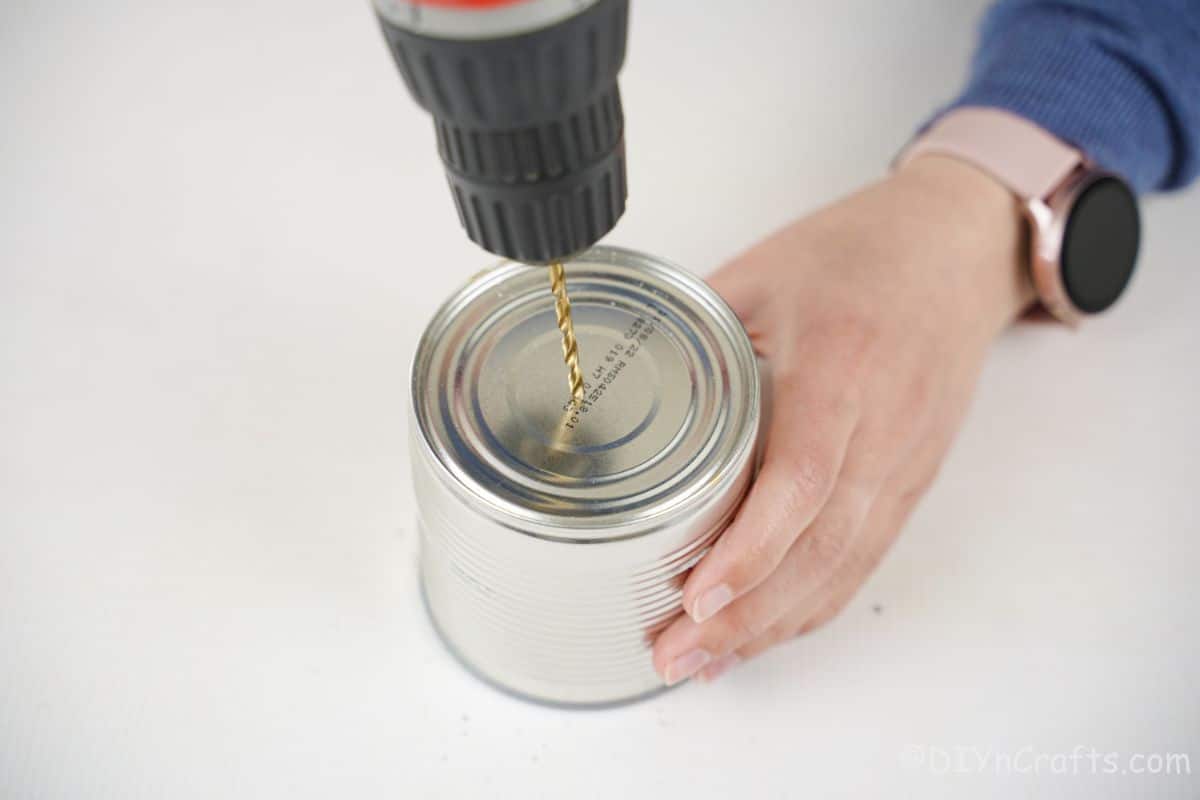
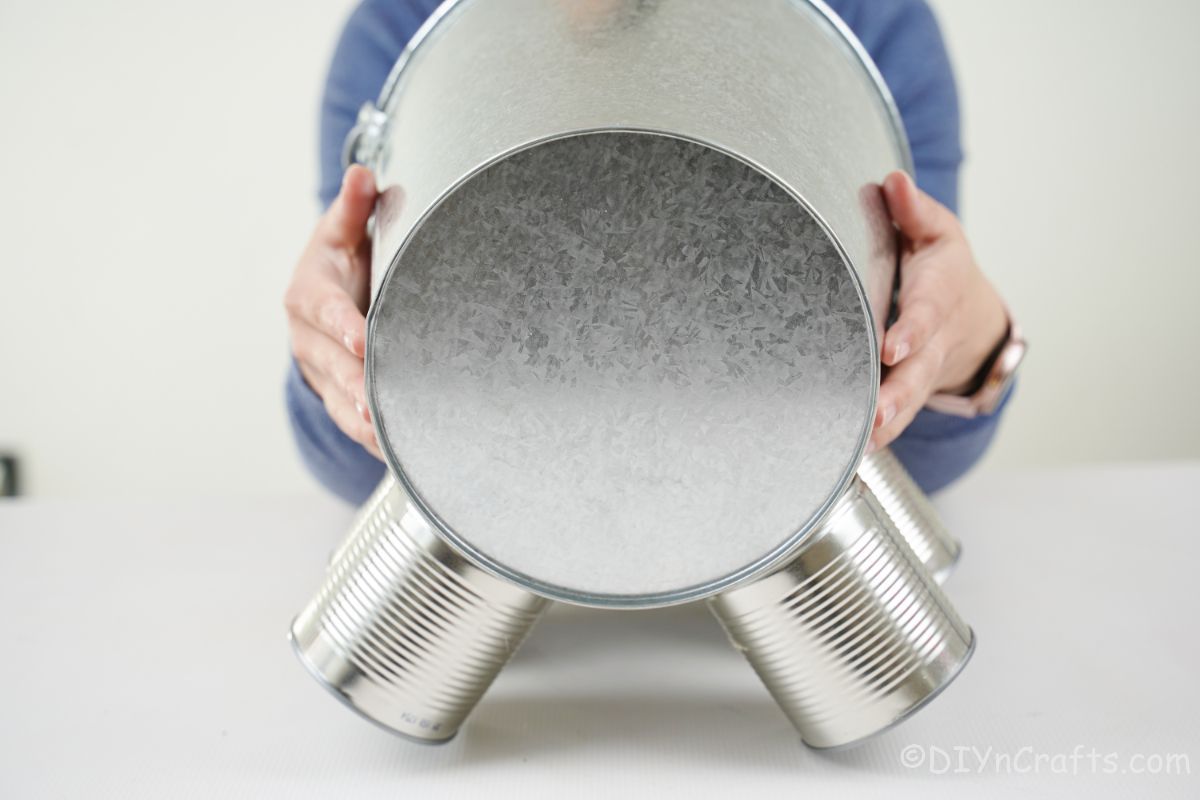
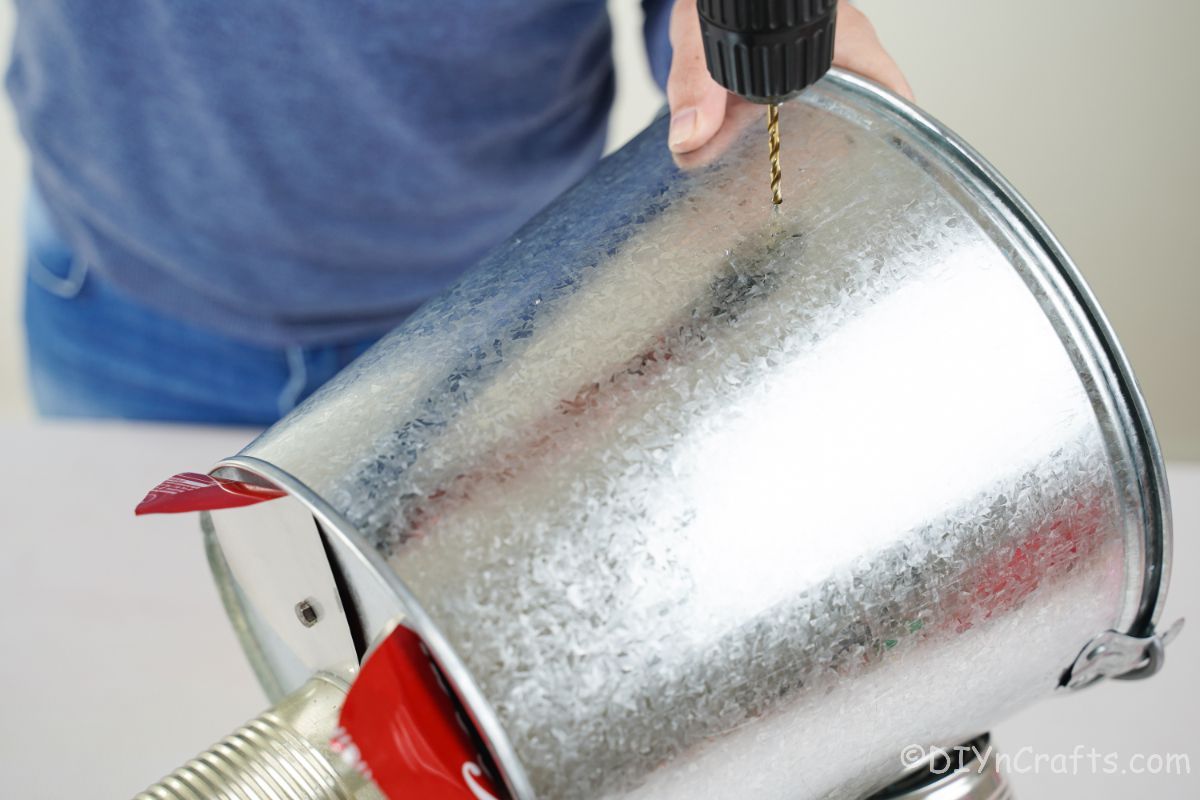
Gather all of the cans and begin drilling holes into them. A drill bit is easiest, but you can also use a nail and hammer. You want 4 holes on the bottom of the largest can or bucket. Add them two per side for the legs.
Then, in the 4 medium-sized cans, you will use for the actual legs, add a hole in each of them.
Push the longest bolts through the tops of the tin cans. Then push the end of that bolt through the holes in the bucket. Connect a washer and nut on the inside of the bucket to secure.
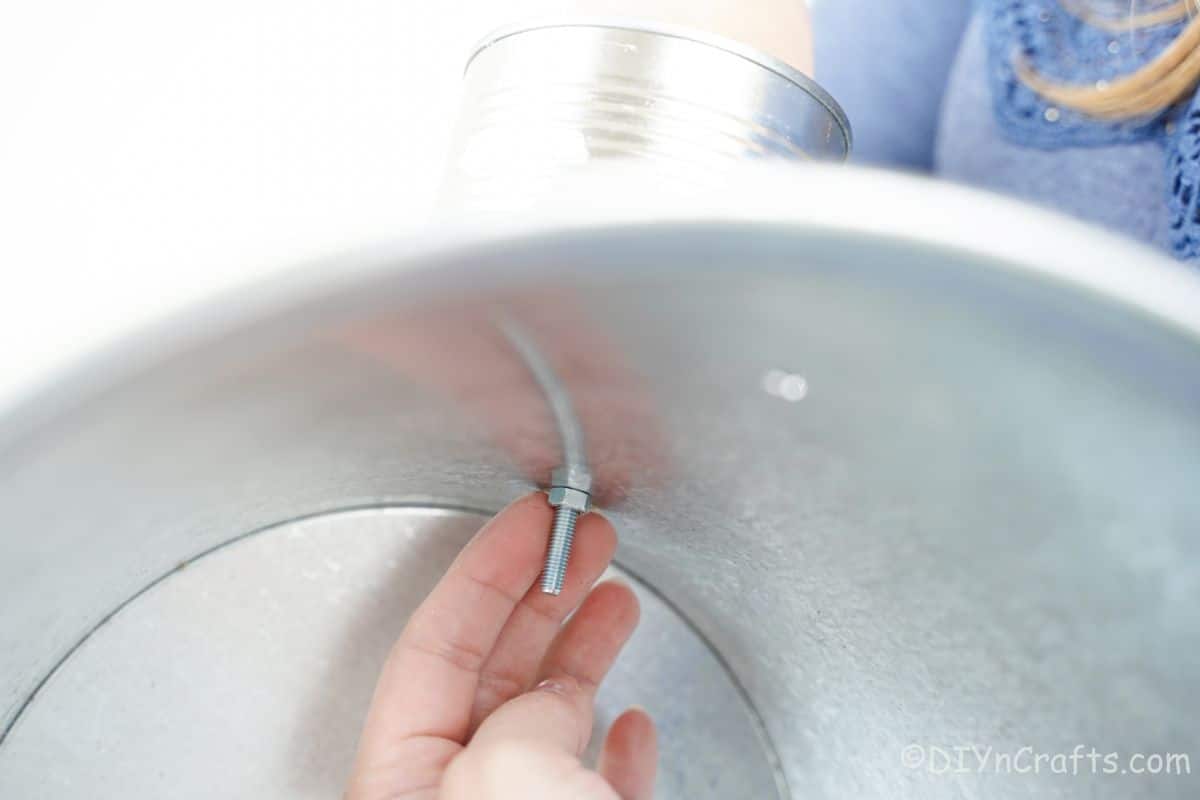
Repeat this for all four legs.
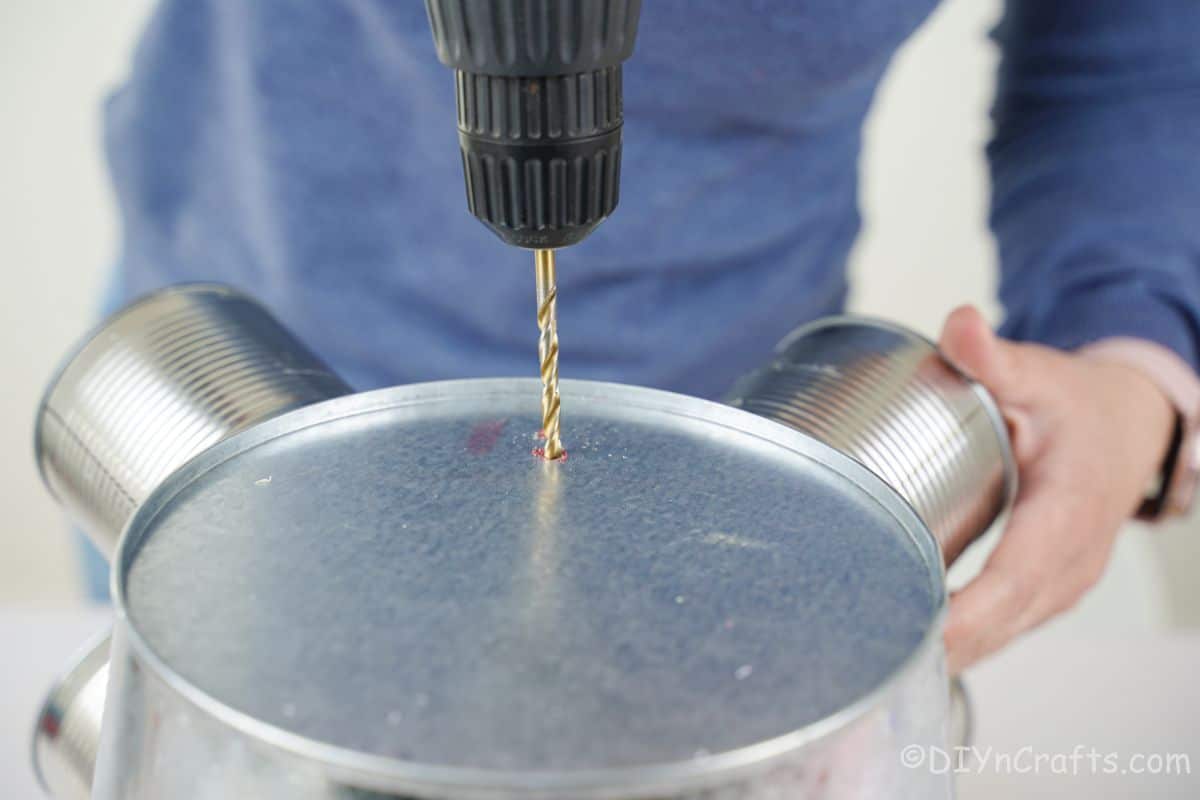
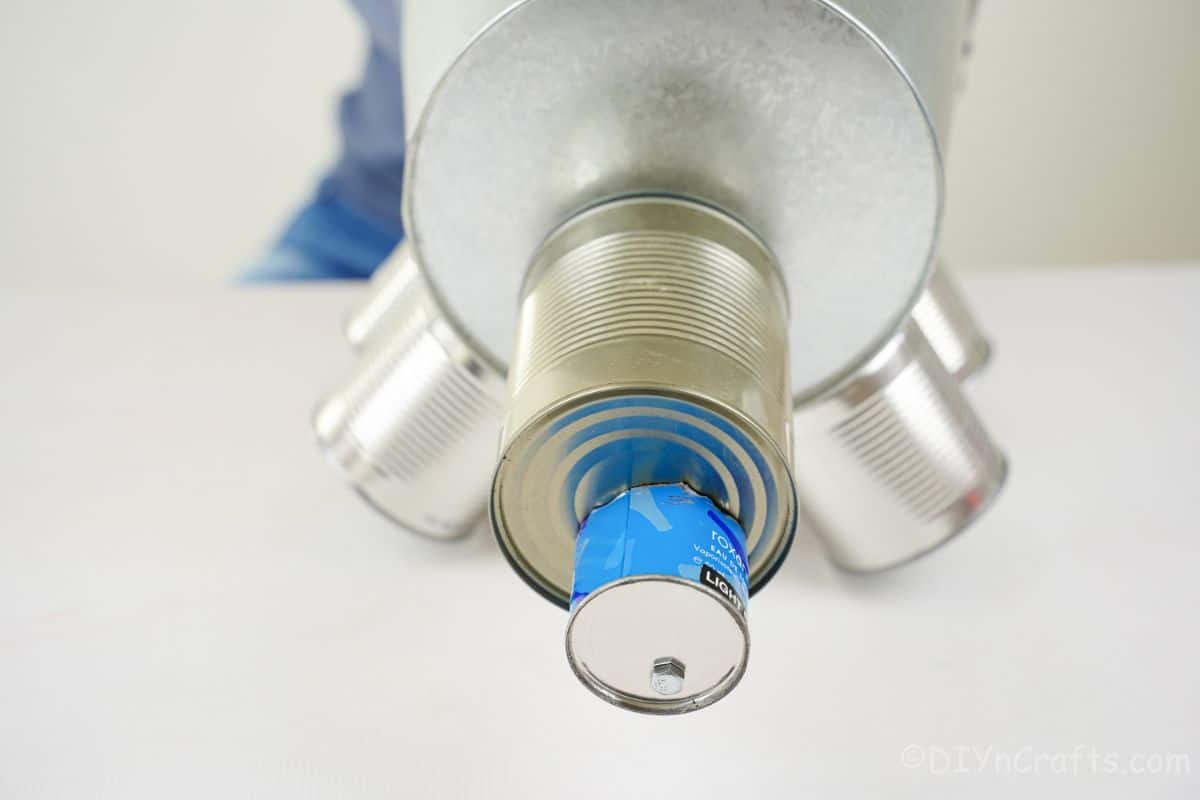
Once all of the legs are secure on the main bucket, use the drill to create a hole on the end of the bucket.
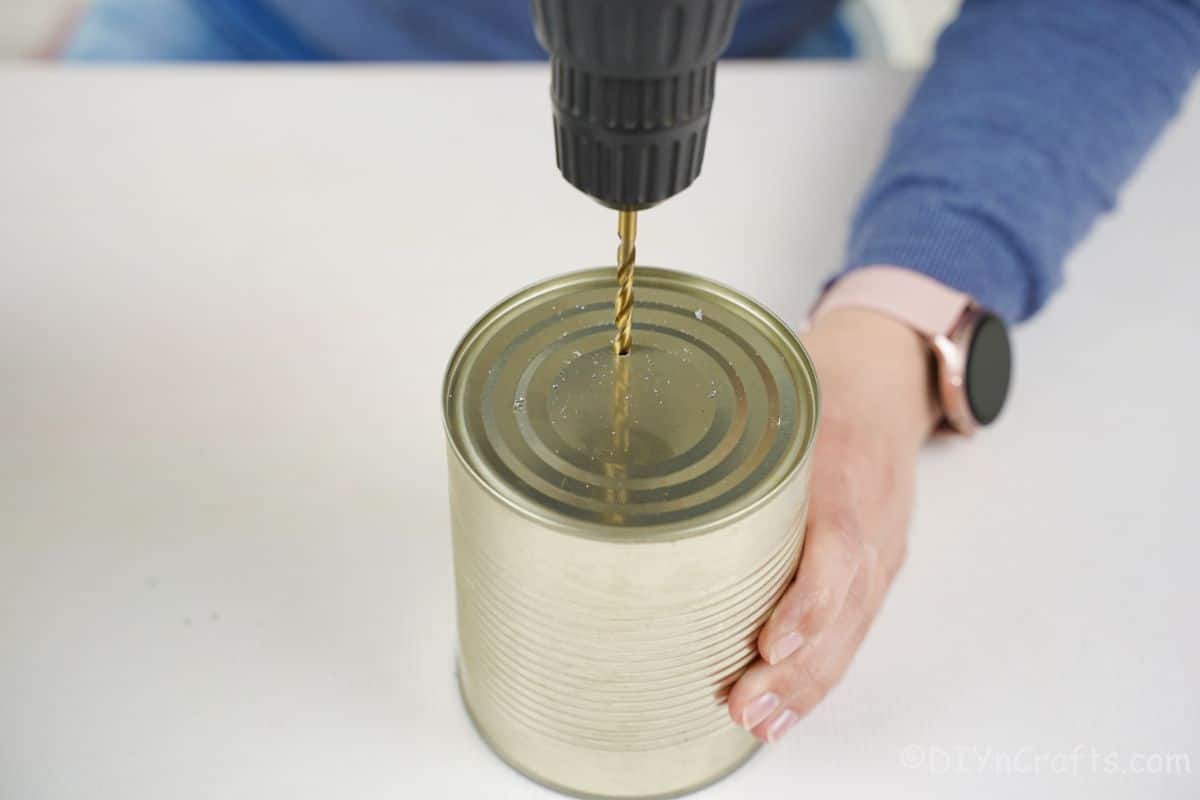
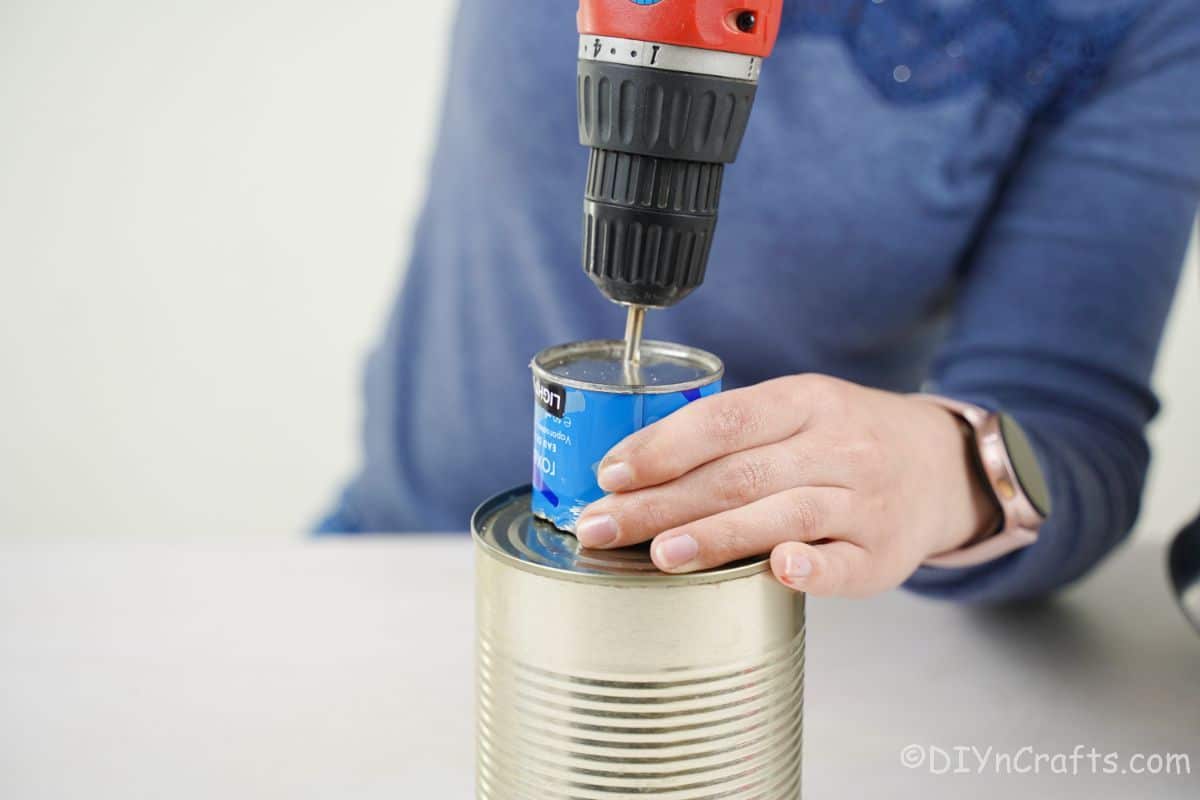
Then drill a hole into the end of the medium can you will use for the pig snout.
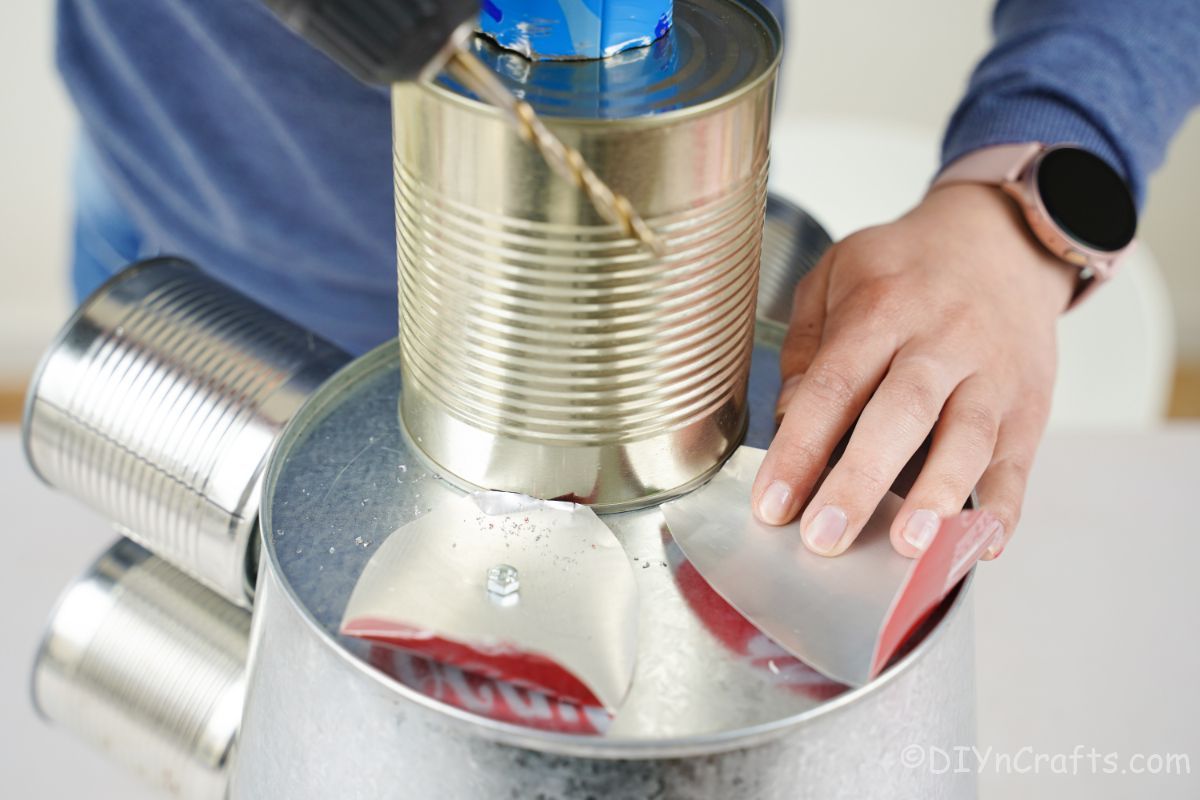
Cut a smaller can in half, and then drill a hole through it to go through the snout. Place the longest screw through the small can, and through the snout, then secure it inside the snout with a washer and nut.
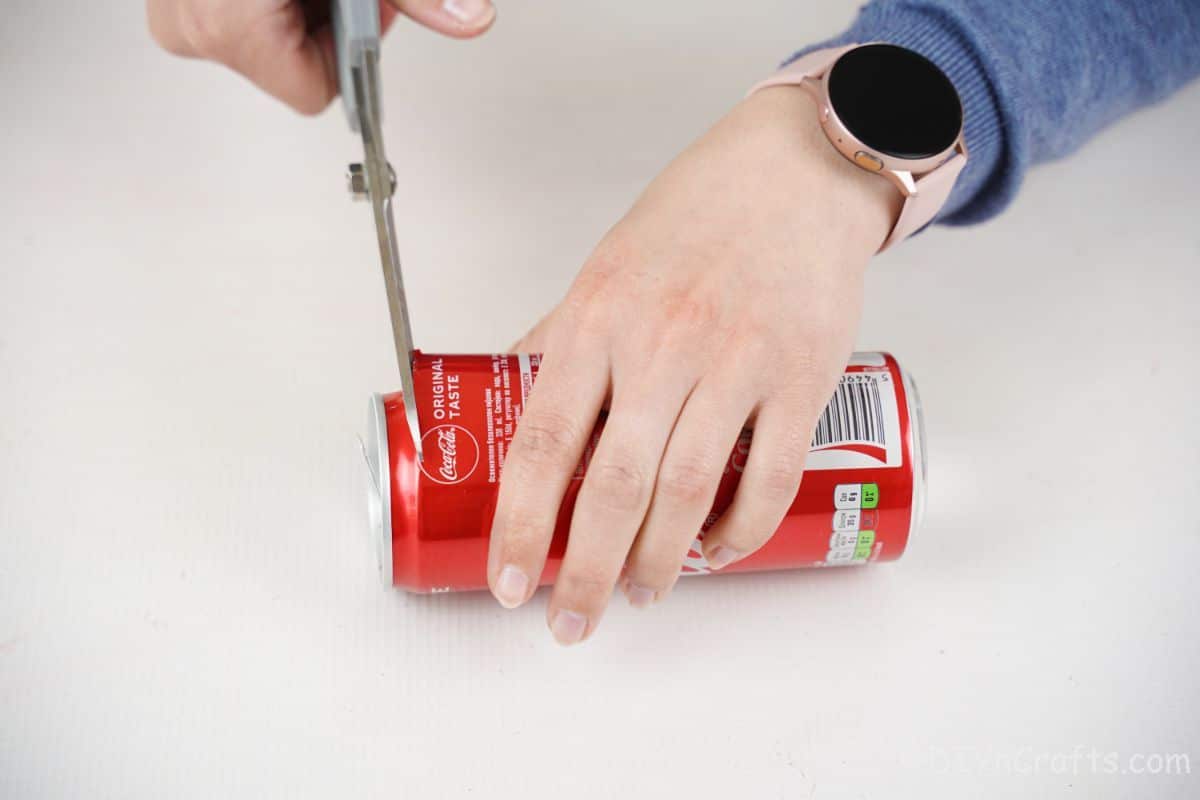
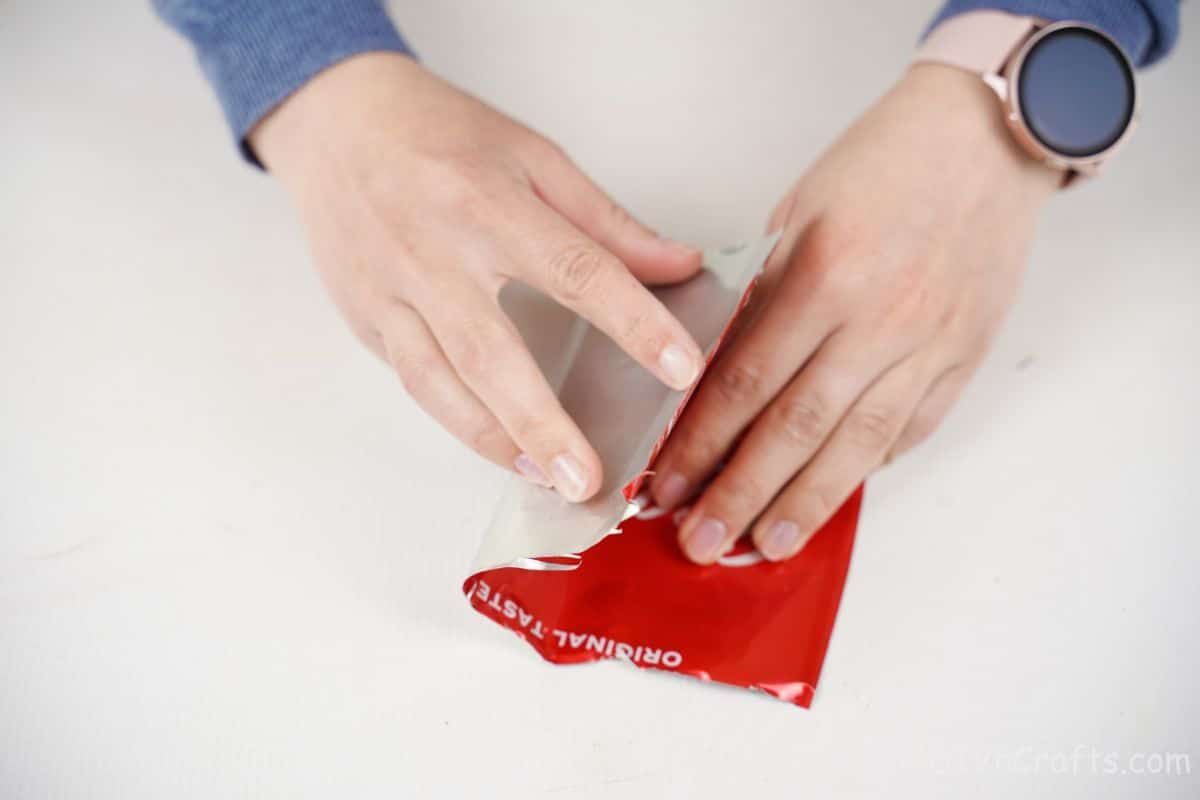
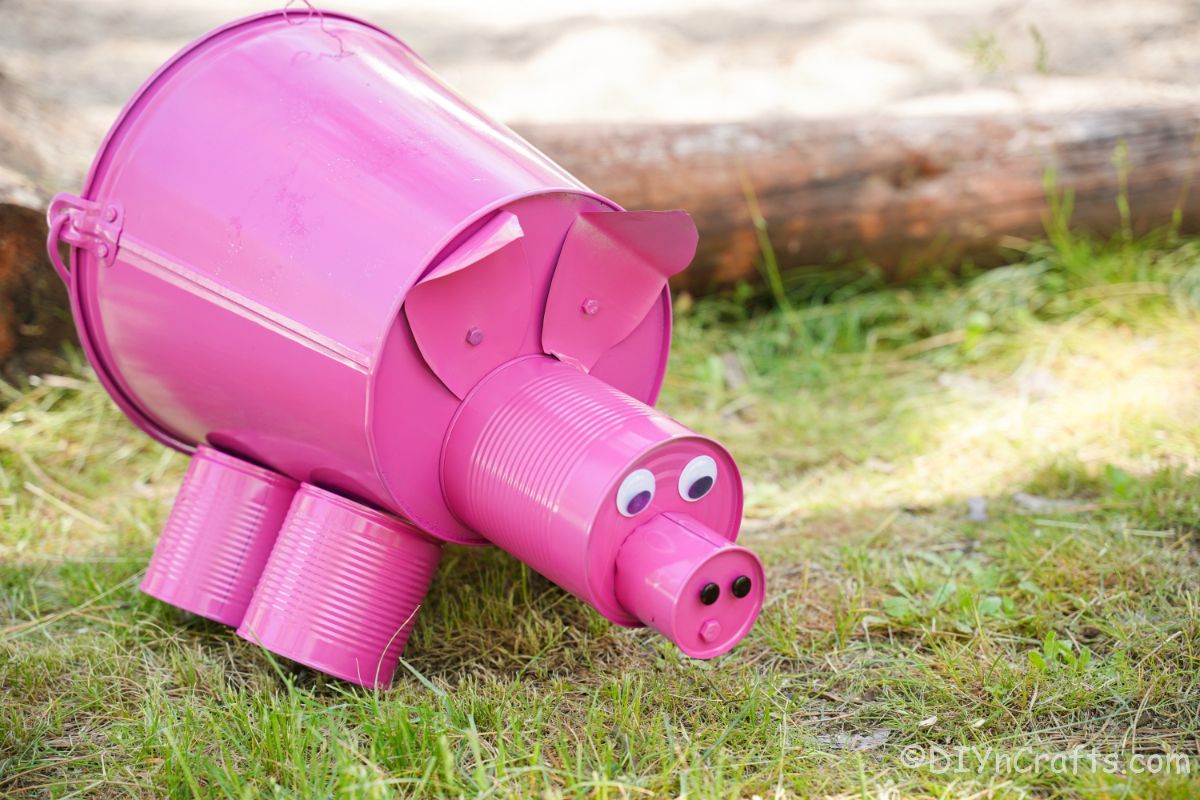
Now push the bolt from the snout through the bucket and secure it inside with a washer and nut. Set the pig bucket aside, and cut the top and bottom off of a soda can.
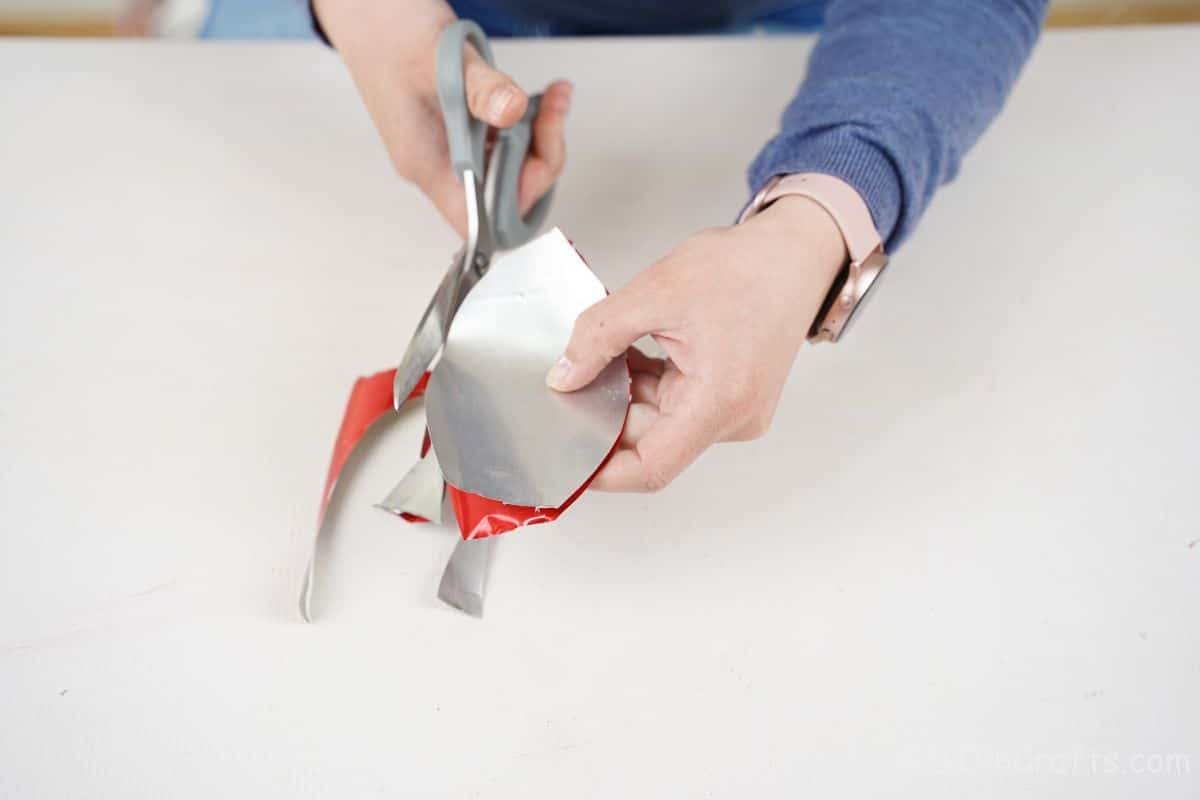
Trim off jagged edges, then cut out a pig ear shape so you have created 2 ears since the can is folded over itself.
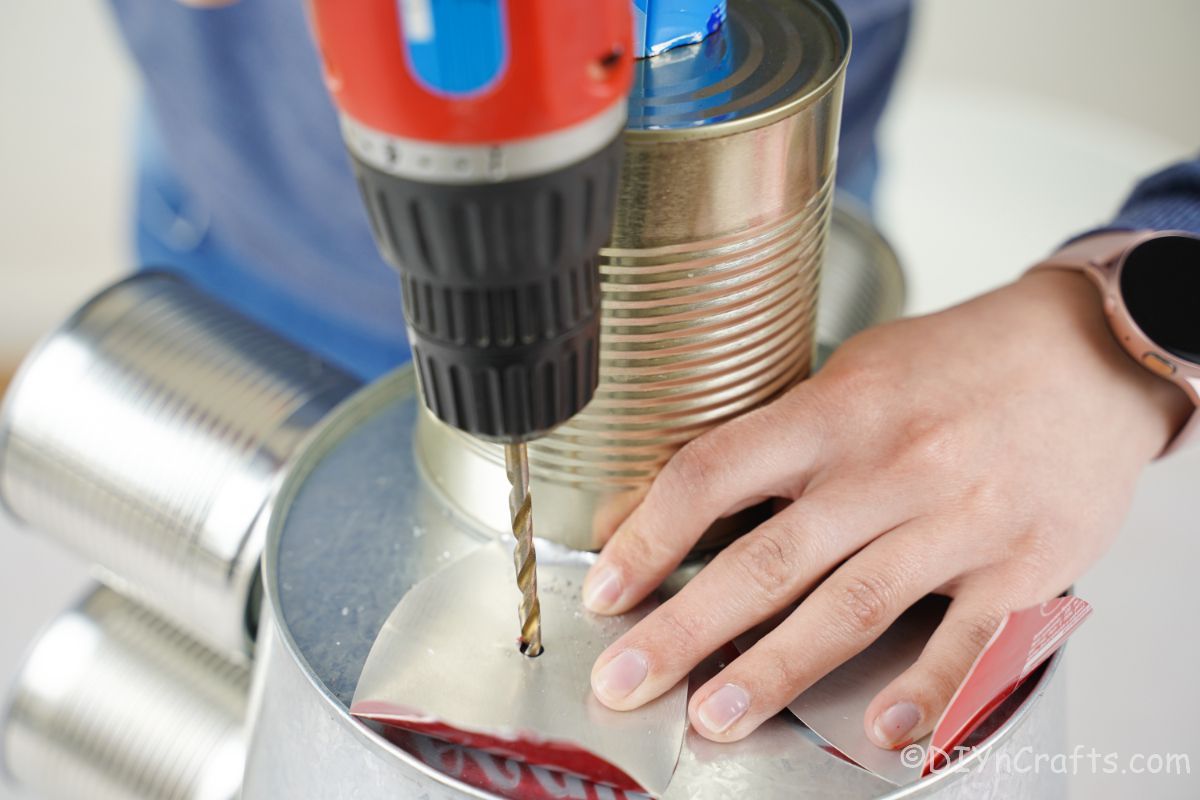
Drill the ears through the top of the bucket behind the snout.
Now drill a small hole in the back open end of the bucket. Create a spiral tail for the pig, and secure it through the hole.
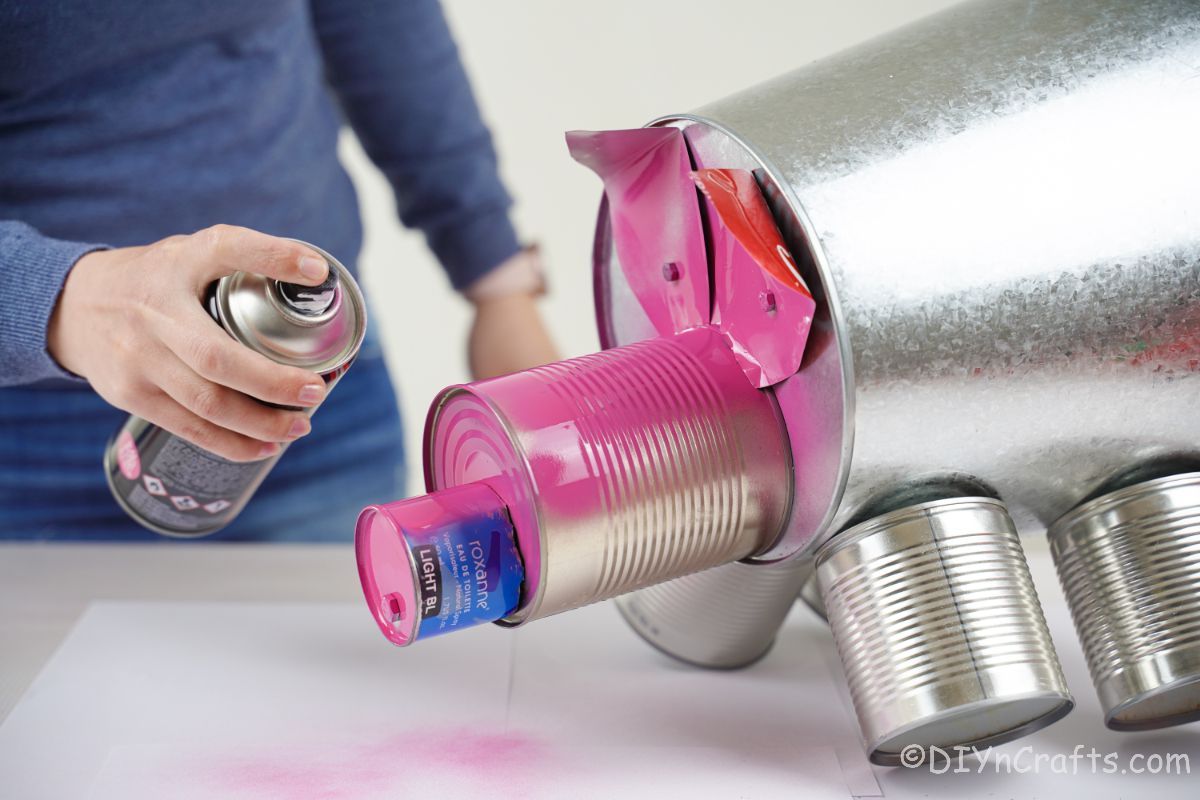
Spray paint the entire pig pink until well coated, then set aside to dry.
Once the can has dried completely you can add googly eyes and buttons for the nose.
Display in your garden!
More Tin Can Craft Ideas
Grab the other leftover tin cans you have on hand and turn them into fun additions to your decor or garden. Below are a few more of my favorite ideas that use tin cans as the center. Make sure that you bookmark the ideas, print out the tutorials, or pin them to Pinterest to make soon.
Yield: 1
What a cute tin can pig! The perfect upcycled craft to create a fanciful pig for your garden decorations this summer!
Active Time
30 minutes
Additional Time
30 minutes
Total Time
1 hour
Difficulty
Medium
Estimated Cost
$0
Instructions
- Begin by making holes in the bucket with a drill. You will make a total of 4 holes, two per side of the bucket, for the legs.
- Then drill a hole into the top of 4 tin cans (15 oz size was used).
- Push a bolt through the tin can so the length is on the outside of the can.
- Then push the bolt through the hole on the side of the can.
- Reach inside and add a washer then the nut and tighten to secure the can to the larger bucket. Tighten as desired by hand or with a wrench.
- Once all of the legs are secure on the main bucket, use the drill to create a hole on the end of the bucket.
- Now, use the drill to create a hole on the end of a slightly larger can (20 oz is good).
- Next, place a smaller can or a can cut in half, on top of the larger can you just put a hole into it. Drill through the smaller can so that it also creates a hole in the larger can, just below where you made its original hole.
- Put a long screw through the larger can so the top of the screw is on the outside of the top of the can and the screw is long enough to go through the can and into the bucket to secure.

- Then, place the smaller can over the top of the large can, and push the bolt through it and through the hole in the top of the larger can.
- Reach inside and place a washer and nut to secure the small half can
- Now, push the bolt that is sticking out of the larger can, through the hole at the end of the bucket.
- Reach inside and secure it in place with a washer and nut.
- Set aside the bucket and can pig and cut the top and bottom off of a soda can.
- Cut through the side of the can creating a sheet of aluminum.
- Fold this in half and cut out the shape of a pig’s ear, cutting through both pieces so you have two identical ears.
- Fold the top more pointed end down slightly so it looks like an ear is “flopping” over.
- Now, place these on the end of the bucket, just above the set of two cans.
- Use a drill to drill through the ears and the bucket.
- Place a bolt through each ear, then secure it on the inside of the bucket with a washer and nut.
- On the top back (open end) of the bucket, drill a hole.
- Twist the jewelry wire into a spiral shape.
- Stick the end of this through the hole in the bucket to create a pig’s tail. You can twist it inside to hold in place or even add a dot of glue on the inside to keep it secure.
- Now, spray the entire thing with pink spray paint coating it one to two times so all of the bucket, cans, legs, ears, etc. are covered in pink. Set this aside to dry for at least 30 minutes or until the paint is no longer tacky.
- Once the paint has dried, glue the googly eyes on the front of the “face” can just above the smaller half can.
- Then glue the two buttons on the smallest can on the front to create the pig’s nose.
Notes
Make this in any size you want using different tin cans or buckets you have available.
Recommended Products
As an Amazon Associate and member of other affiliate programs, I earn from qualifying purchases.
Finished Project Gallery
Add different colors to make your pig unique!


